
Analytics pt 2: Implementing Unity Analytics

Header photo by Lucas Pezeta
In the previous article we covered the why of analytics and the funnel we defined for the Dinopirates Playtest. Now comes the how: from configuring the Unity Dashboard to the initialization code.
The goal of this article is to get Unity Analytics running in your project with good practices from the start.
Configuration in Unity Dashboard
Before writing a single line of code, the project needs to be configured in dashboard.unity3d.com.
Linking the project
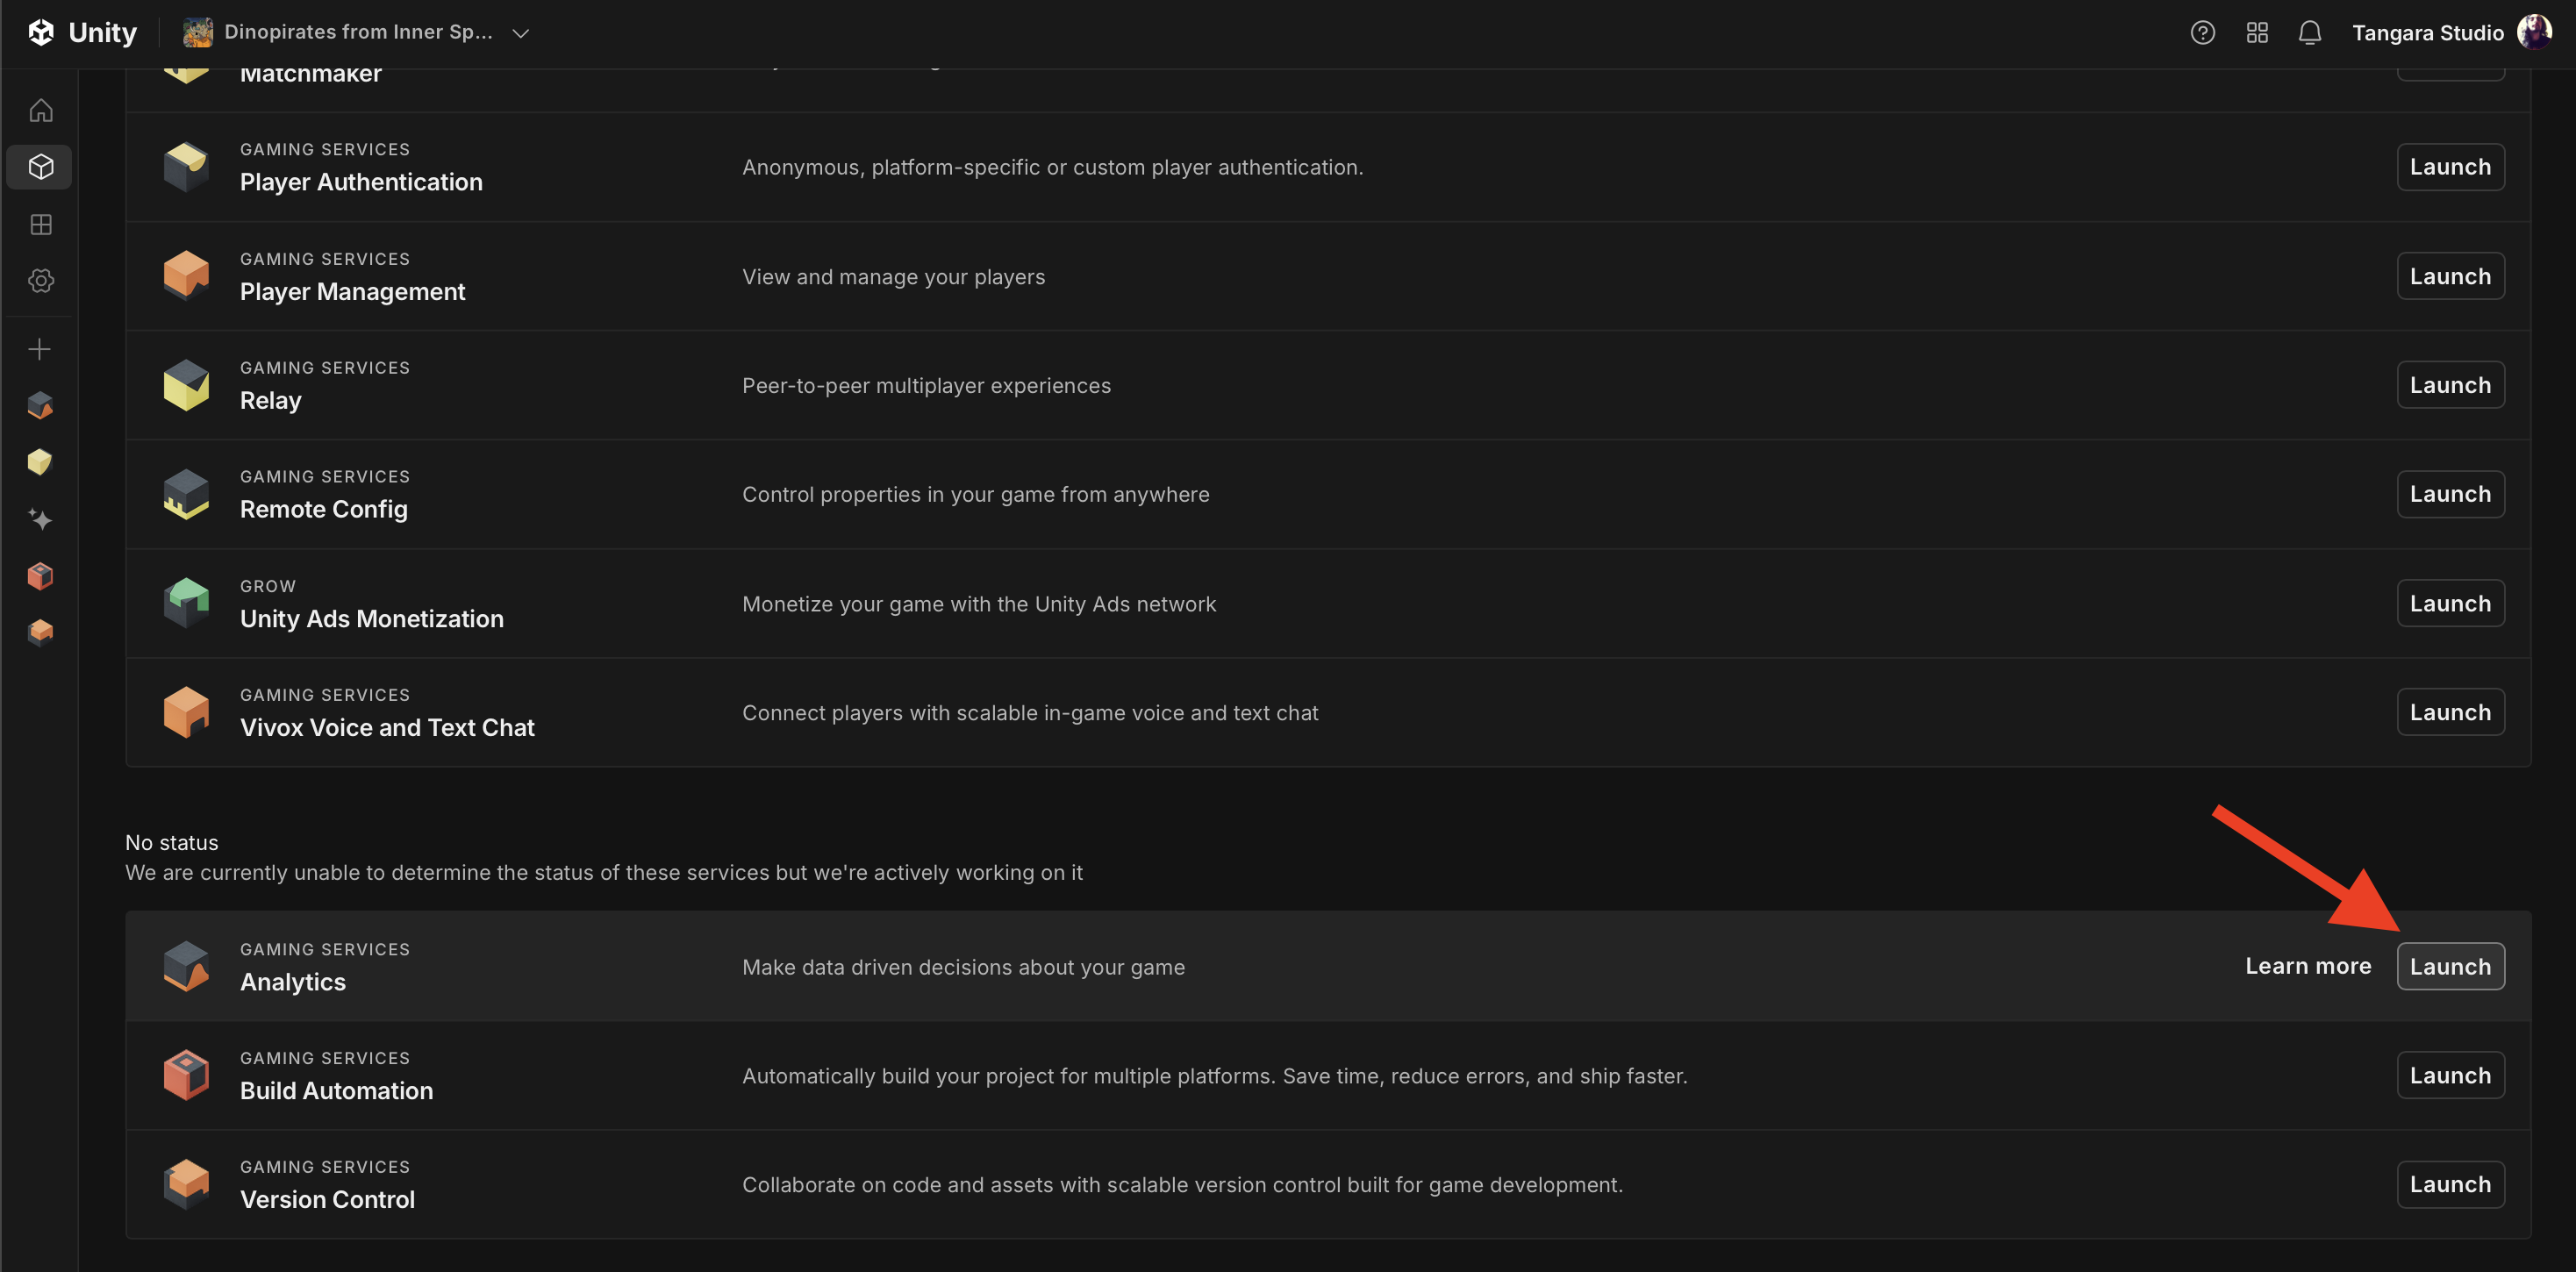
In the Unity Dashboard, once the project is initialized, the Analytics service should activate automatically. To validate it, go to the Services tab and scroll to the bottom of the page until you find the Analytics service.
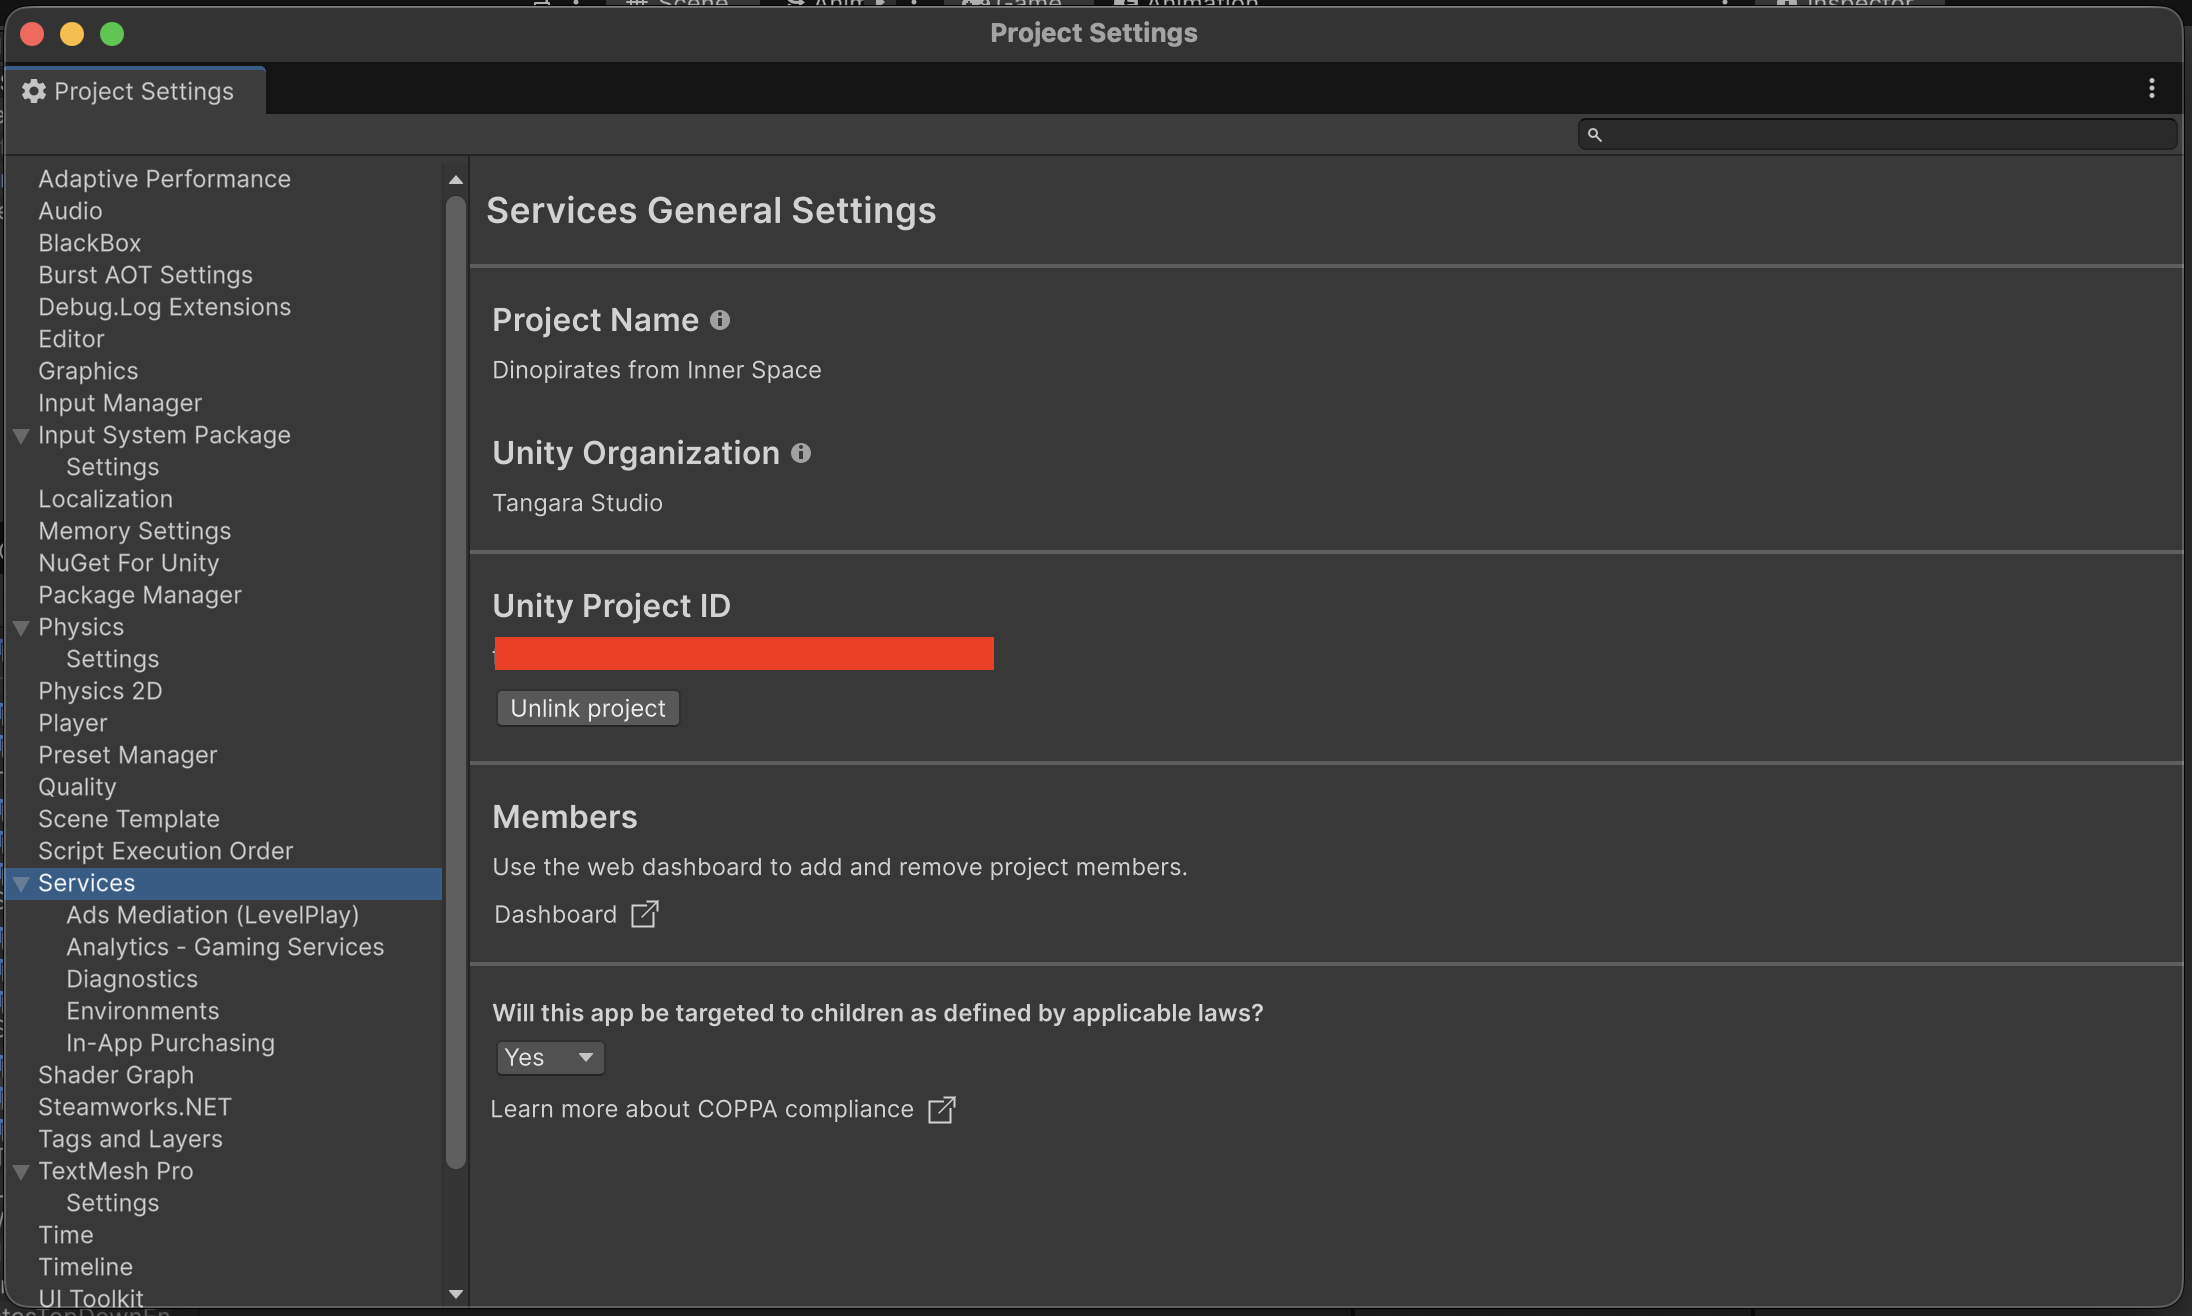
In Unity Editor, you can verify the project is linked correctly by going to Edit → Project Settings → Services. The Project ID should appear there — the unique identifier Unity uses to associate the events your game sends with the dashboard.
NOTE: In the early days of Dinopirates development, we evaluated using GitHub or Plastic SCM as our version control system. We chose Plastic since, being Unity’s own solution, it handles conflicts and
.metafile management better. One byproduct of that decision is seamless integration with Unity Services, including Analytics. If you use a different version control system, make sure to configure theProject IDcorrectly in your project.
Environment management
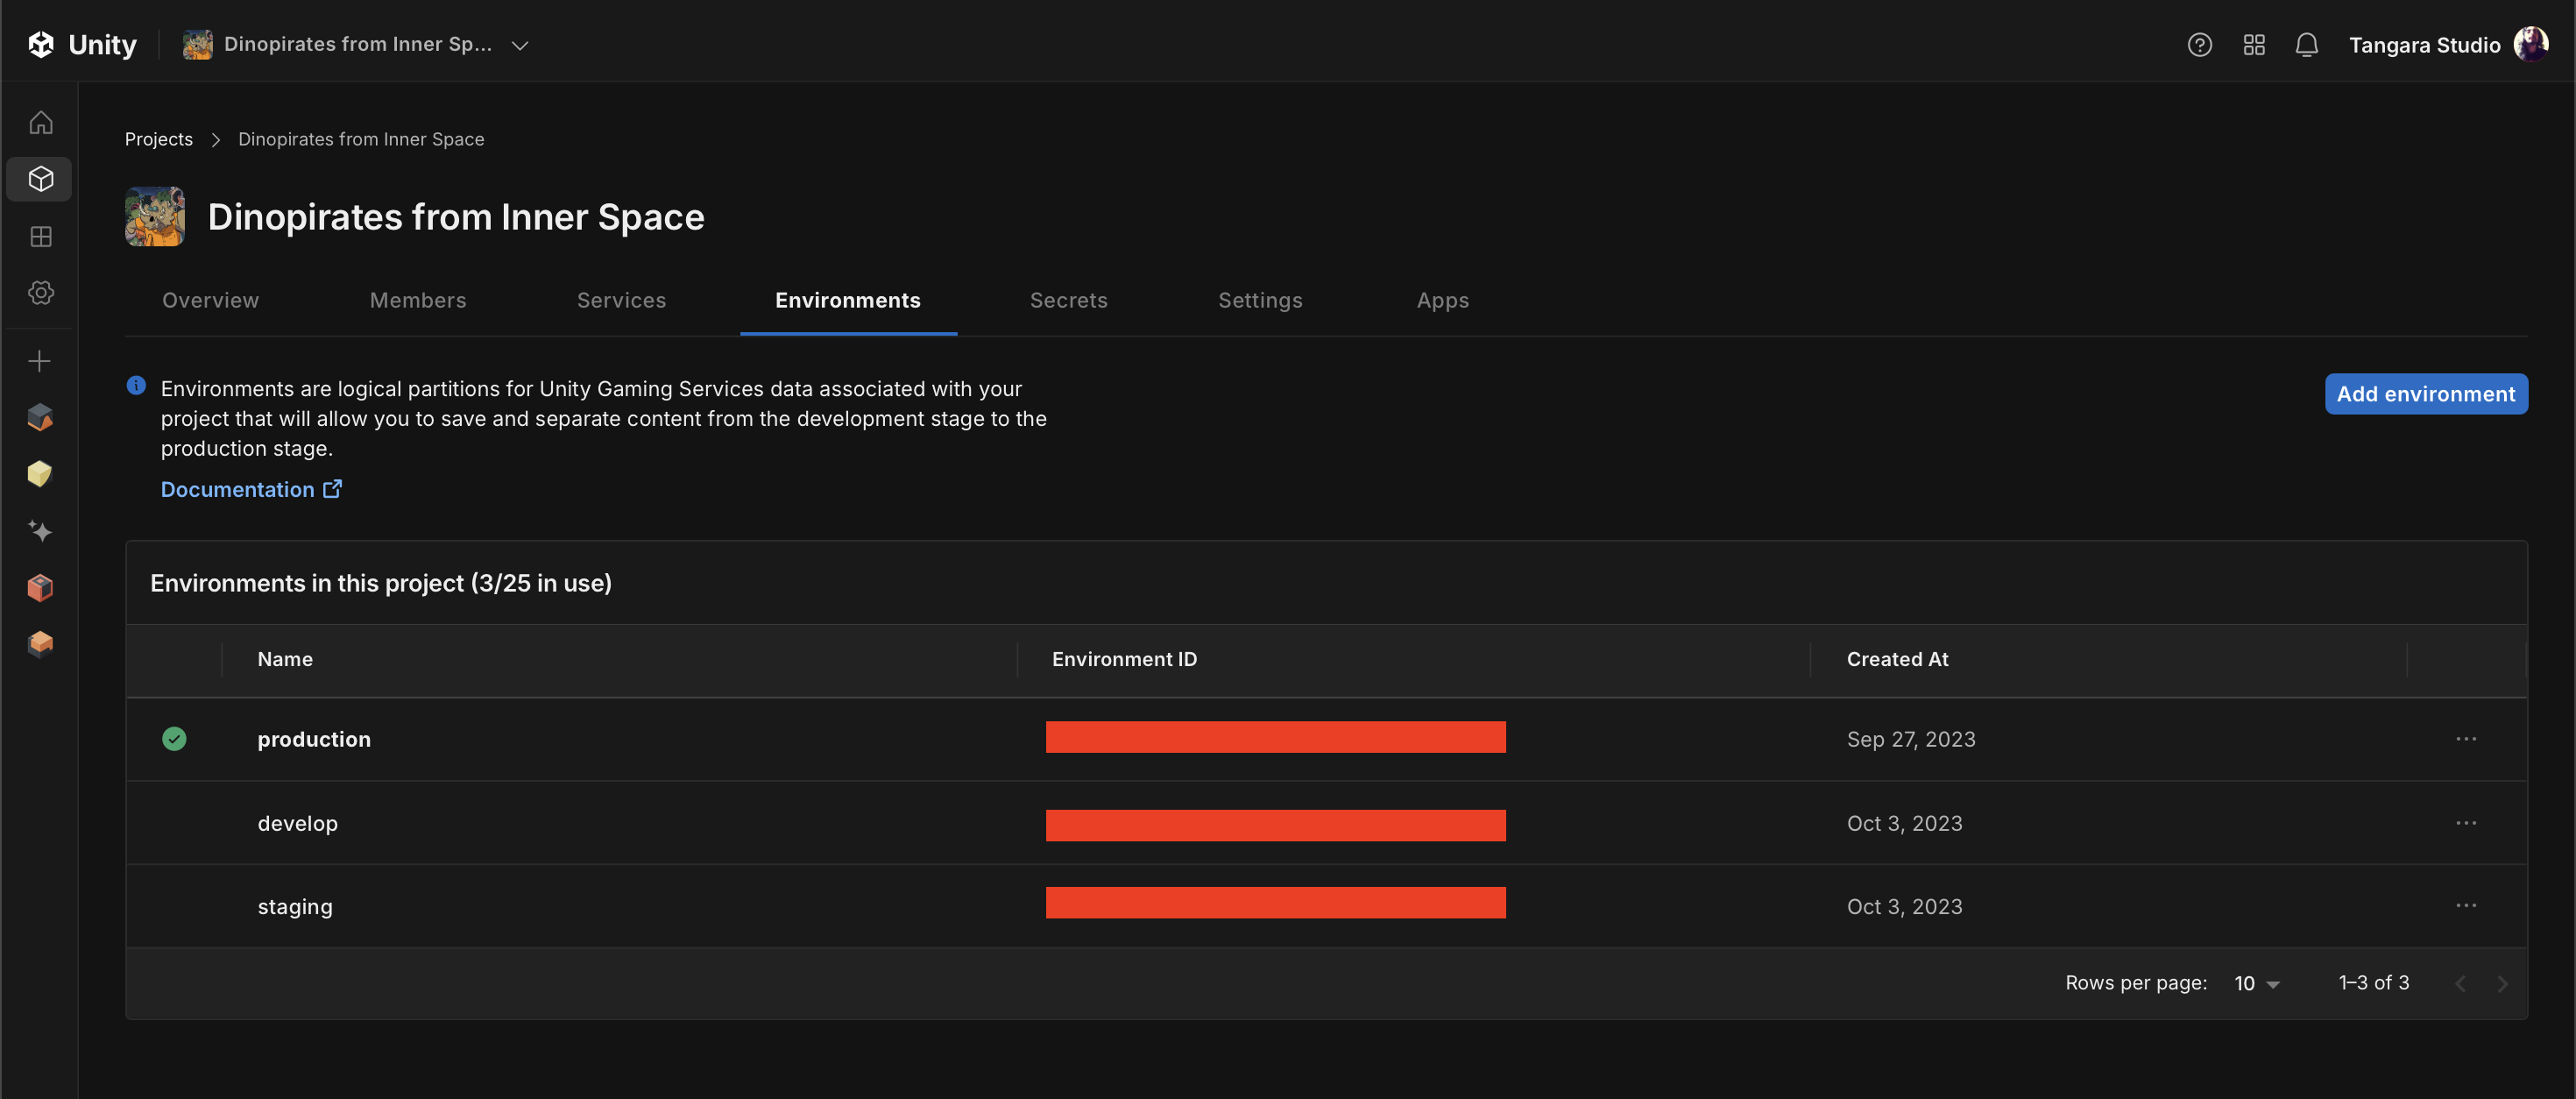
A good practice we implemented from the start in Dinopirates is separating data by environment. Unity Dashboard allows you to create multiple environments per project. We use three:
| Environment | When it’s used |
|---|---|
| develop | Debug builds, local editor testing |
| staging | Internal QA builds. This is the environment Playtest users interact with |
| production | Public builds — eventually the Demo or final release |
This prevents test traffic from contaminating real data. Seeing 500 deaths in develop when they’re actually runs from the team testing balance is exactly the kind of noise that ruins a dataset.
In the Dashboard, on the project home, look for the Environments tab before starting the integration.
Installing the package
In Unity 6, install the package from Window → Package Manager → Unity Registry → Analytics, or add it directly to Packages/manifest.json:
"com.unity.services.analytics": "6.3.0"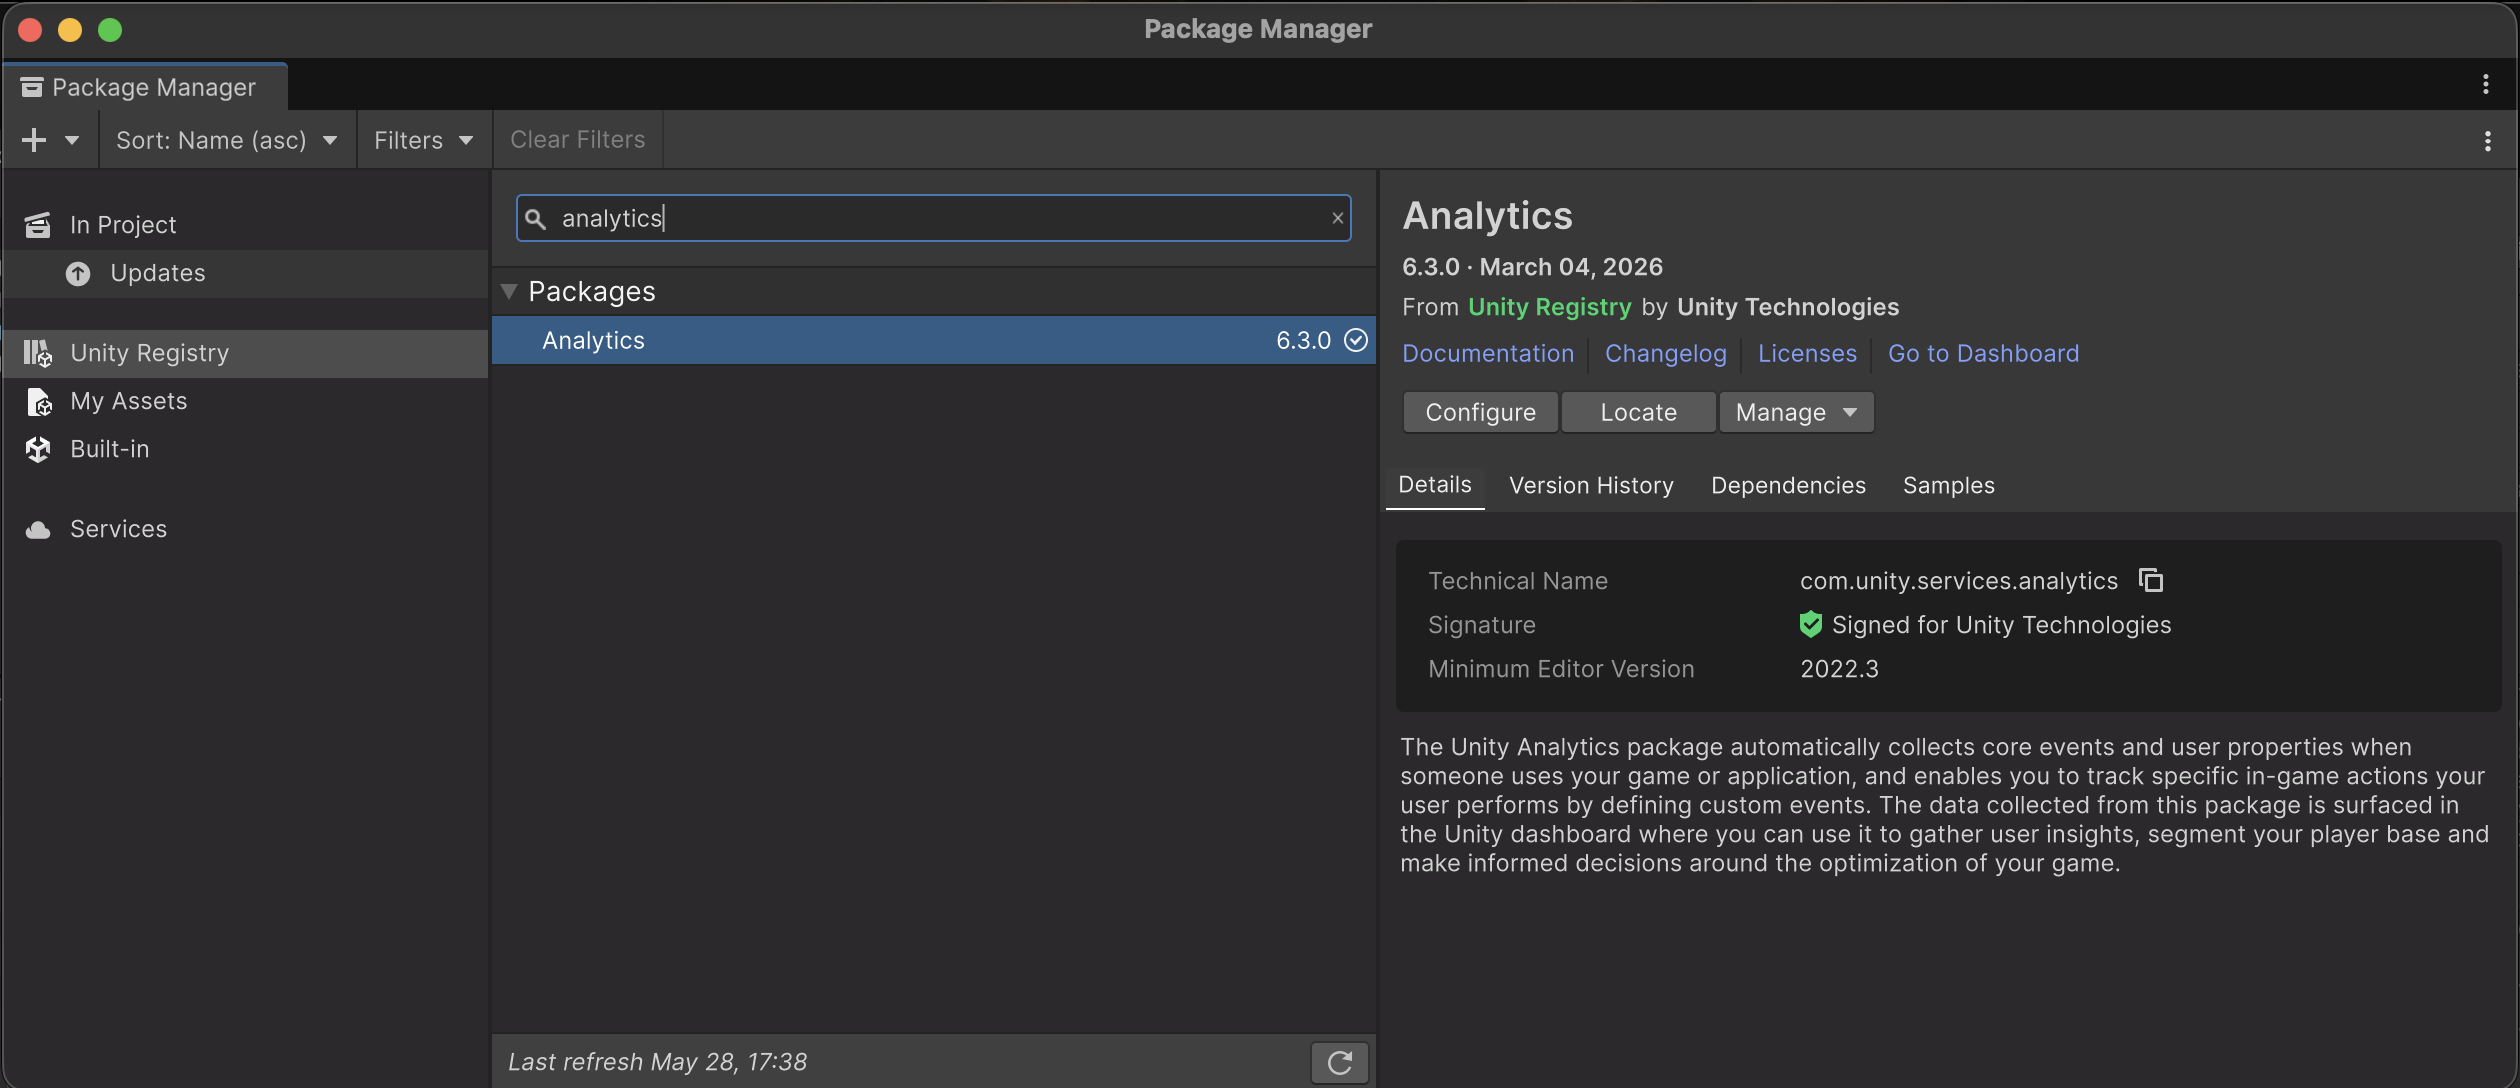
Verify the latest version in the Package Manager. The API changed significantly between version 4.x and 6.x. This article covers 6.x.
Initialization with environment selection
Initialization goes in the first system that loads in your game. The key point is passing the correct environment name to InitializationOptions, so that events reach the right environment based on the build type.
async void InitAnalytics()
{
    var options = new InitializationOptions();
    options.SetEnvironmentName(GetCurrentEnvironment());
    await UnityServices.InitializeAsync(options);

    if (consentAlreadyGranted)
        OptInAnalytics();
}

string GetCurrentEnvironment()
{
    if (Debug.isDebugBuild)
        return "develop";

#if TANGARA_QA_ENABLED
    return "staging";
#else
    return "production";
#endif
}
Separating environments by Debug.isDebugBuild and scripting symbols ensures no test data reaches production, without having to remember to change anything manually between builds.
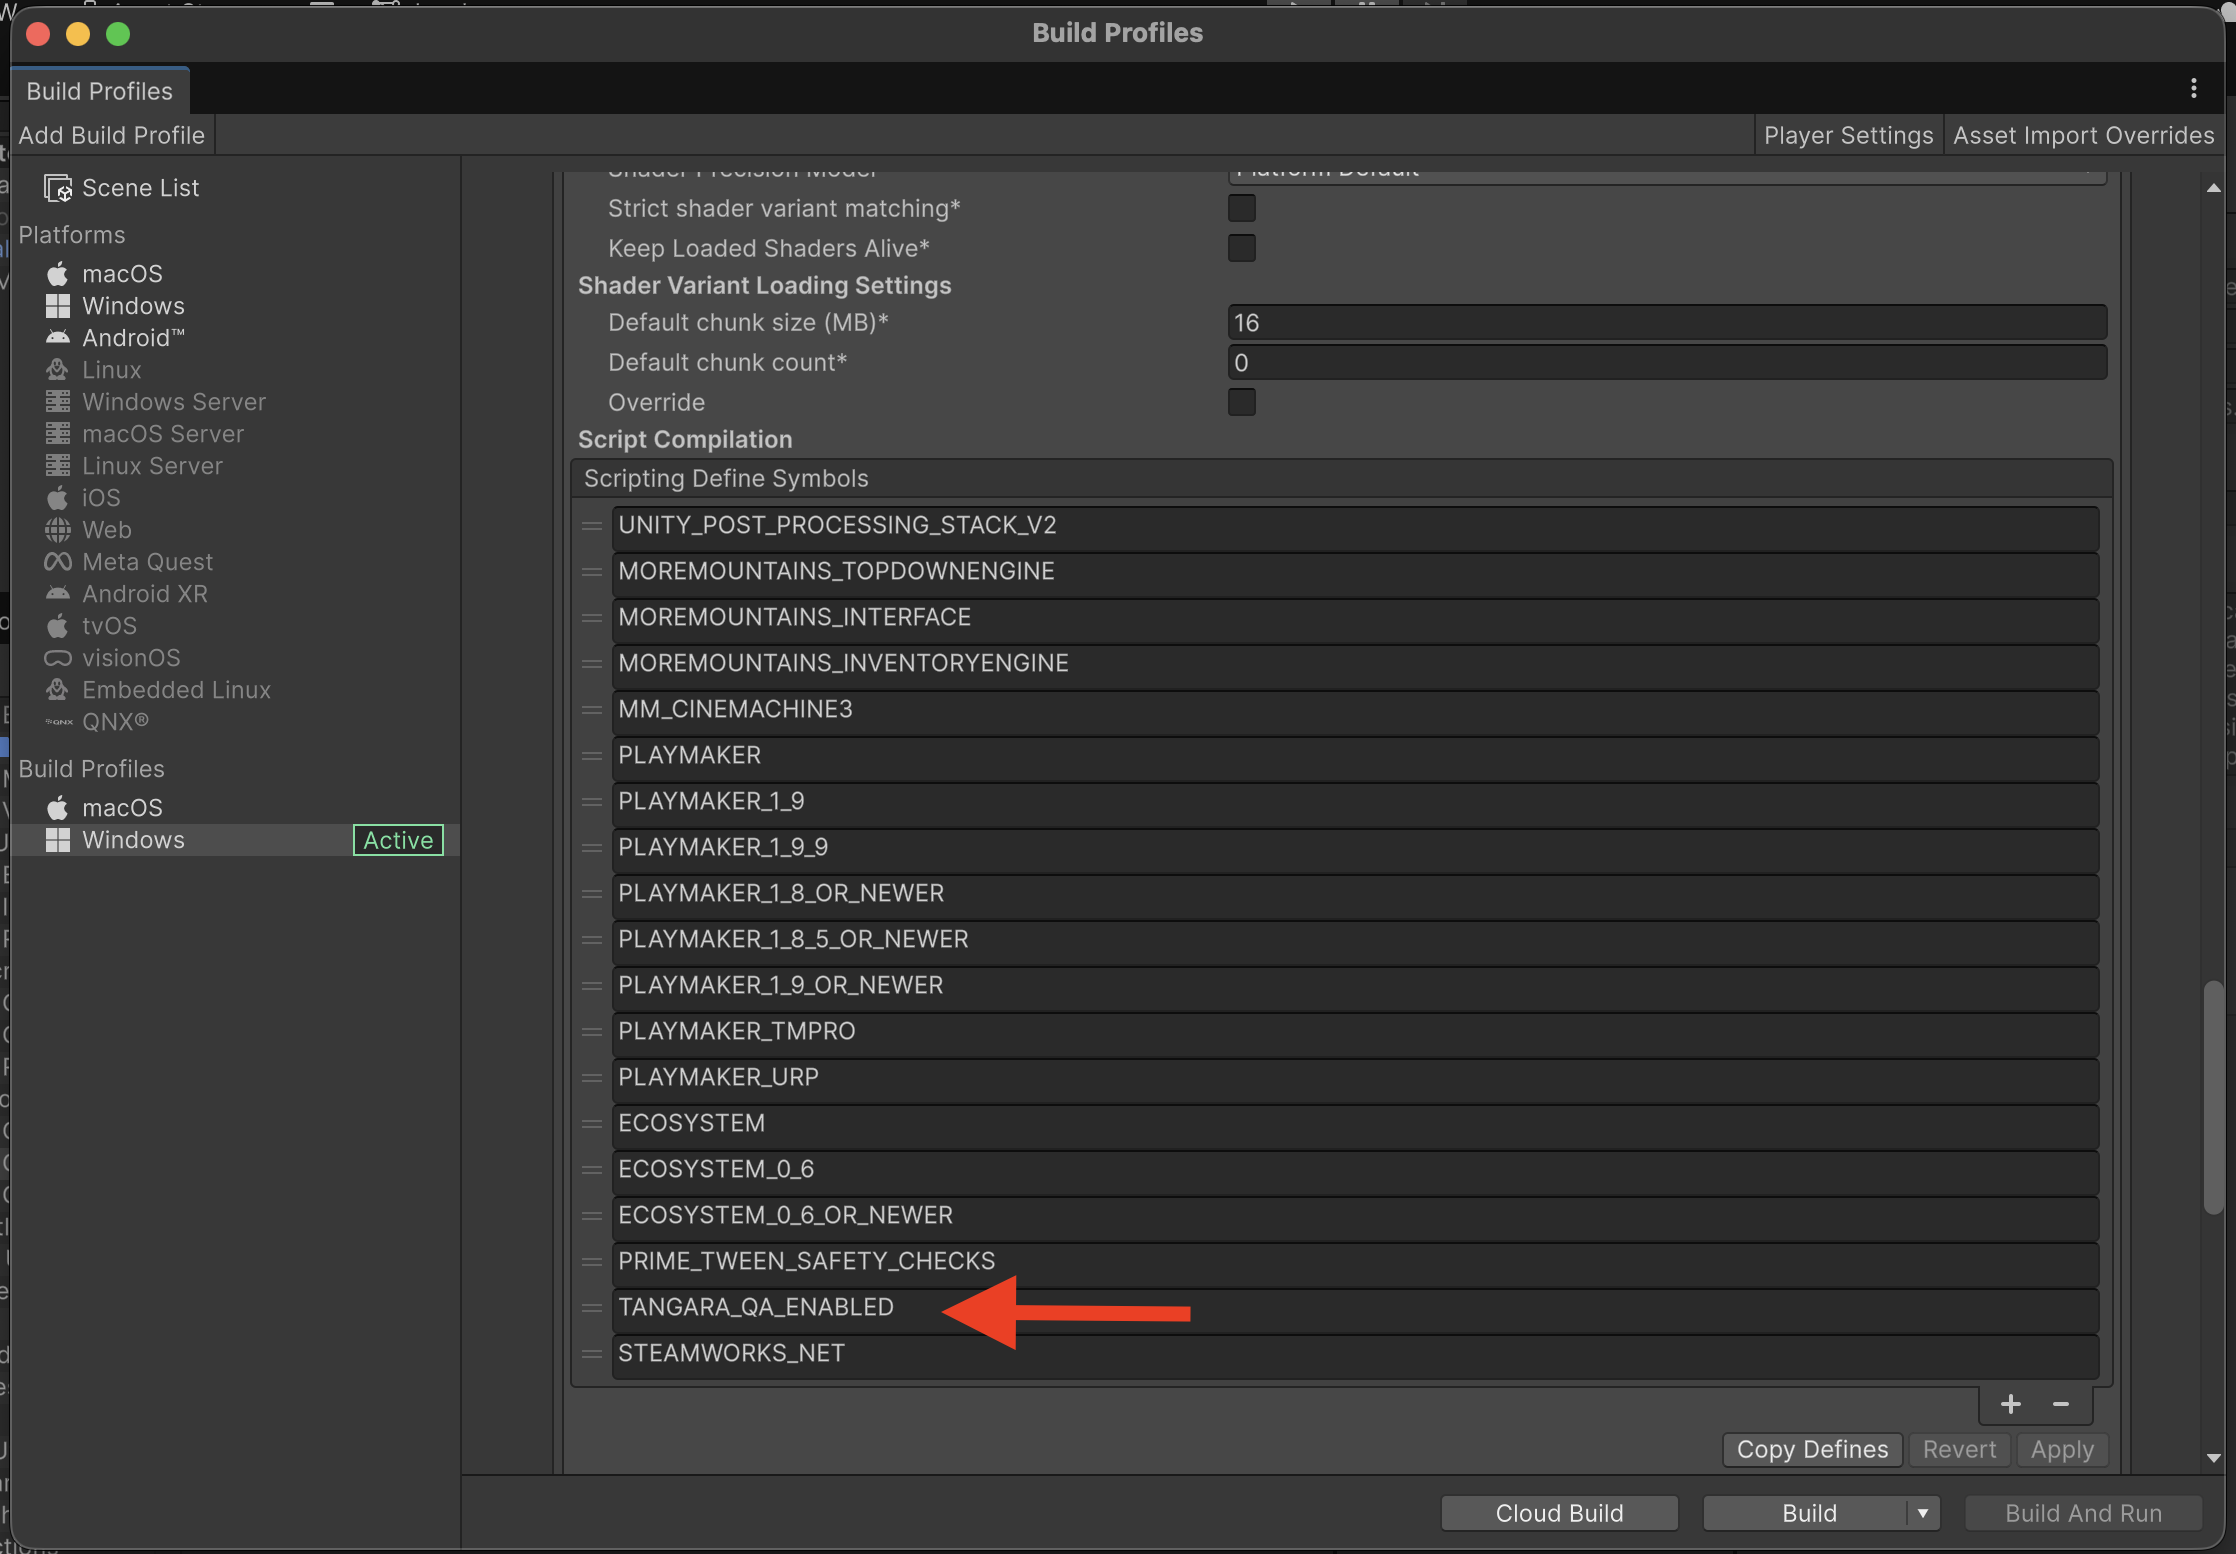
The TANGARA_QA_ENABLED variable is a custom scripting symbol we set specifically for the Playtest build. It’s configured in the build profiles.
User consent
Unity Analytics does not collect data by default. The SDK expects you to explicitly call opt-in after the user accepts. If you skip this step, nothing reaches the dashboard.
This isn’t an arbitrary restriction: it’s compliance with GDPR and similar privacy regulations. You must ask the player for permission before collecting any data. At Tangara Studio we also provide our users with a declaration about data usage and its purpose. It’s important to have a privacy policy in place.
The correct flow
Game starts
    ↓
Do we have a saved answer?
    ├── Yes, Granted → Direct OptIn, no alert shown
    ├── Yes, Denied  → Don't collect, continue
    └── No           → Show consent alert
                          ├── Accepts → save Granted, OptIn
                          └── Declines → save Denied
Implementation
In Dinopirates, the TSAnalyticsManager class handles this by reading the saved state from player settings before initializing services. Below is this class, which you can adapt to your own project:
// TSAnalyticsManager.cs
using System;
using UnityEngine;
using UnityEngine.UnityConsent;
using Unity.Services.Core;
using Unity.Services.Analytics;
using Unity.Services.Core.Environments;
using MoreMountains.Tools;

[Serializable]
public enum TSAnalyticConsent
{
    None,
    Granted,
    Denied,
}

public enum DPEnvironment
{
    Develop,
    Staging,
    Production
}

public class TSAnalyticsManager : MMPersistentSingleton<TSAnalyticsManager>
{
    [MMReadOnly] public TSAnalyticConsent CurrentAnalyticConsent = TSAnalyticConsent.None;

    public static DPEnvironment CurrentEnvironment() {
        if (Debug.isDebugBuild == true)
        {
            return DPEnvironment.Develop;
        }
        else
        {
#if TANGARA_QA_ENABLED
            return DPEnvironment.Staging;
#else
            return DPEnvironment.Production;
#endif
        }
    }

    public void ValidateConsent(Action<TSAnalyticConsent> callback)
    {
        LoadSettings();
        InitAnalytics(); // Async: initializes services and calls OptIn if consent was already granted

        callback(CurrentAnalyticConsent);
    }

    async void InitAnalytics()
    {
        var options = new InitializationOptions();
        options.SetEnvironmentName(CurrentEnvironment().ToString().ToLower());
        await UnityServices.InitializeAsync(options);

        if (CurrentAnalyticConsent == TSAnalyticConsent.Granted)
        {
            OptInAnalytics();
        }
    }

    void LoadSettings()
    {
        // Load Settings
        // TSSaveLoadManager is a class we use to load and save player preferences. In this case,
        // analytic consent is saved in the settings so we don't have to ask the player every time they start the game.
        var settings = TSSaveLoadManager.LoadSettings();
        if (settings != null)
        {
            CurrentAnalyticConsent = settings.AnalyticConsent;
        }
    }

    // Opt In/Out & Delete request
    public void ChangeAndSaveNewConsentState(TSAnalyticConsent newState)
    {
        CurrentAnalyticConsent = newState;
        TSSaveLoadManager.SaveSettings(new() {
            AnalyticConsent = CurrentAnalyticConsent,
        });
    }

    public void OptOutAnalytics()
    {
        ChangeAndSaveNewConsentState(TSAnalyticConsent.Denied);
        var consentState = EndUserConsent.GetConsentState();
        consentState.AnalyticsIntent = ConsentStatus.Denied;
        EndUserConsent.SetConsentState(consentState);
    }

    public void OptInAnalytics()
    {
        var consentState = EndUserConsent.GetConsentState();
        consentState.AnalyticsIntent = ConsentStatus.Granted;
        EndUserConsent.SetConsentState(consentState);
    }

    public void RequestDataDeletion()
    {
        var consentState = EndUserConsent.GetConsentState();
        consentState.AnalyticsIntent = ConsentStatus.Denied;
        EndUserConsent.SetConsentState(consentState);
        AnalyticsService.Instance.RequestDataDeletion();
    }
}
In practice, the first time a player opens the game, a simple alert is shown before the main menu. If they accept, Granted is saved and OptIn is called. On subsequent launches, the state is already saved and the prompt doesn’t appear again.
Best practices for the consent alert
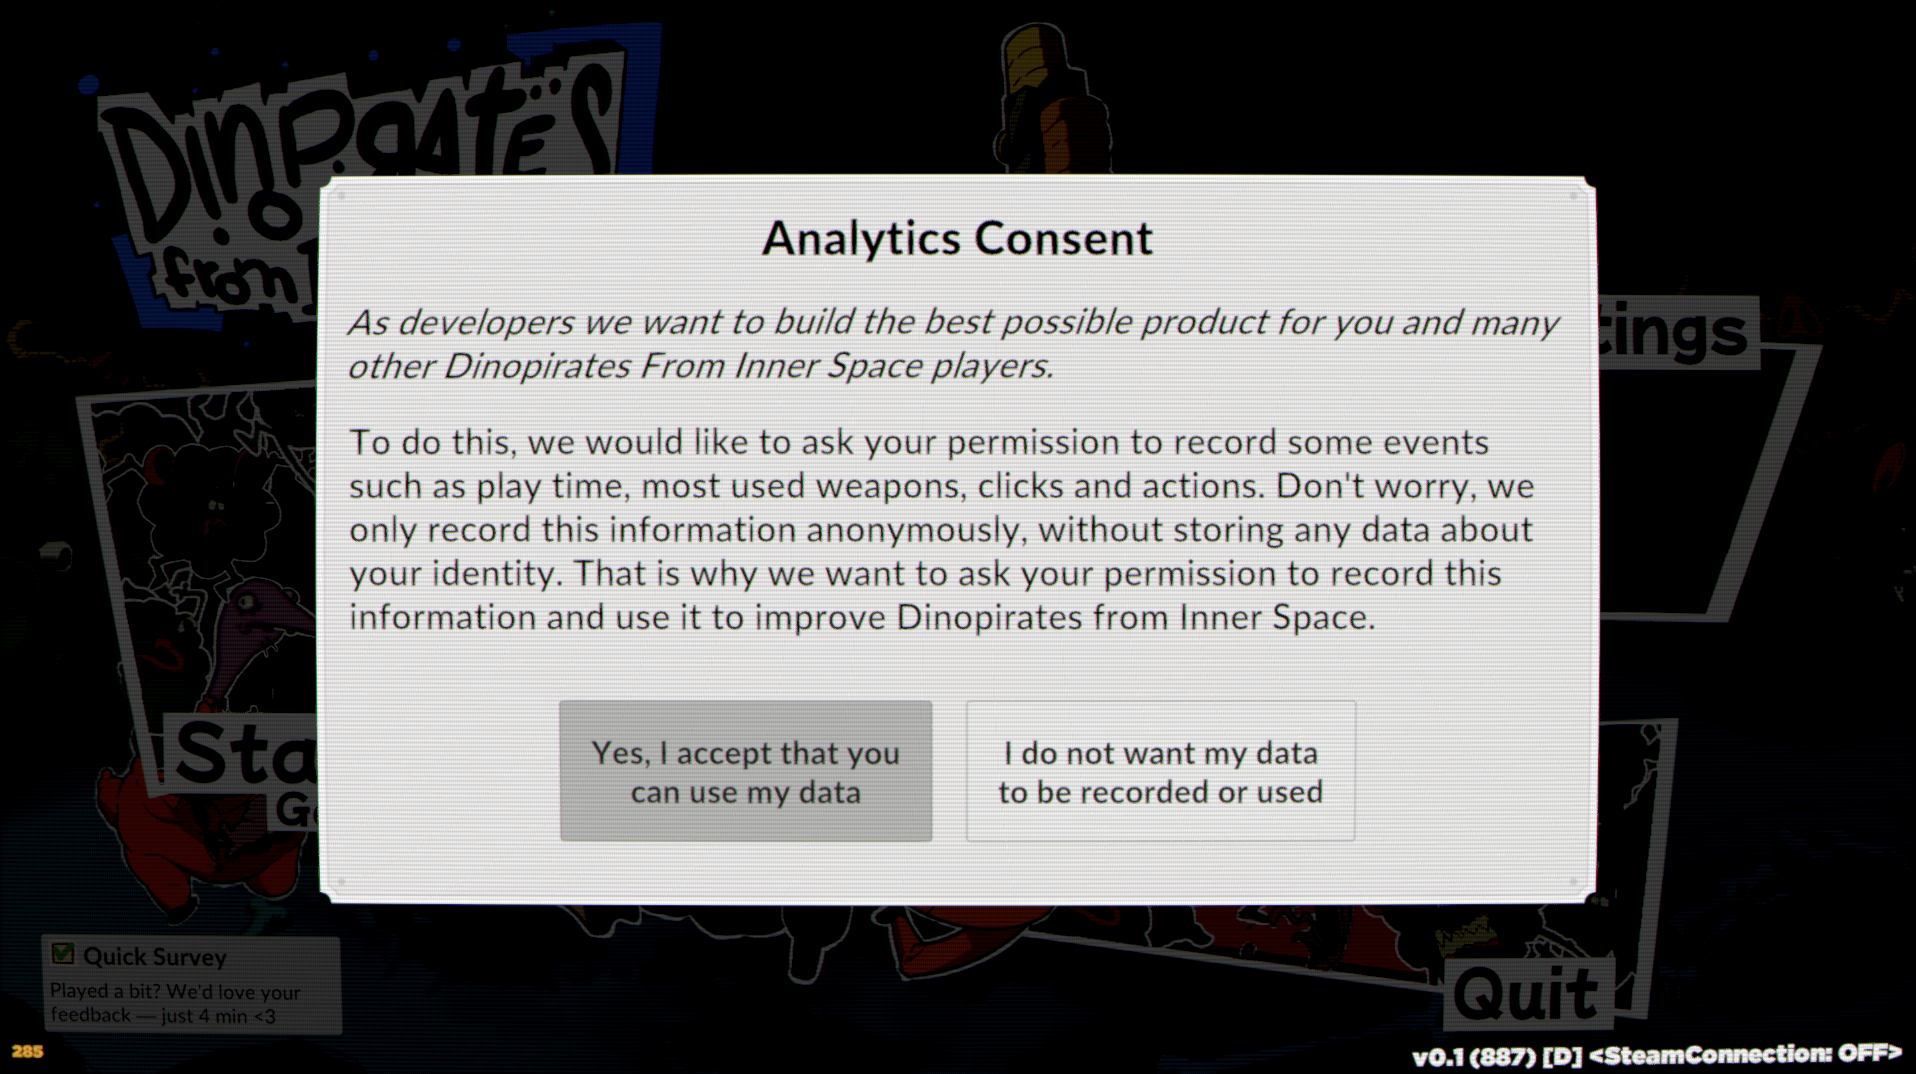
- Clear, brief text. Something like: “Help us improve the game by sharing anonymous session data?” is enough.
- Both buttons (accept and decline) equally visible. Don’t hide the rejection.
- Save the preference. Nobody wants to see that screen every time they open the game.
- Respect the decision. If they decline, don’t degrade the experience in any way.
What you get with the base integration
With this working —without having defined any custom events yet— Unity Dashboard already starts showing data. The most useful for an indie:
| Metric | What it measures |
|---|---|
| DAU / WAU / MAU | Active users per day, week, and month |
| New vs Returning Users | How many players are new each day |
| Average Session Length | Average duration of each session |
| Sessions per DAU | How many sessions each active user averages |
| Countries | Where players are playing from |
| Operating Systems | Distribution of Windows, macOS, Linux |
| Hardware (CPU / GPU) | What hardware players have |
For a Playtest, this already answers important questions: are people coming back to play? How much time do they spend per session? Where are they playing from? Does your audience’s hardware match your performance targets?
In the dashboard, the information will look similar to this.
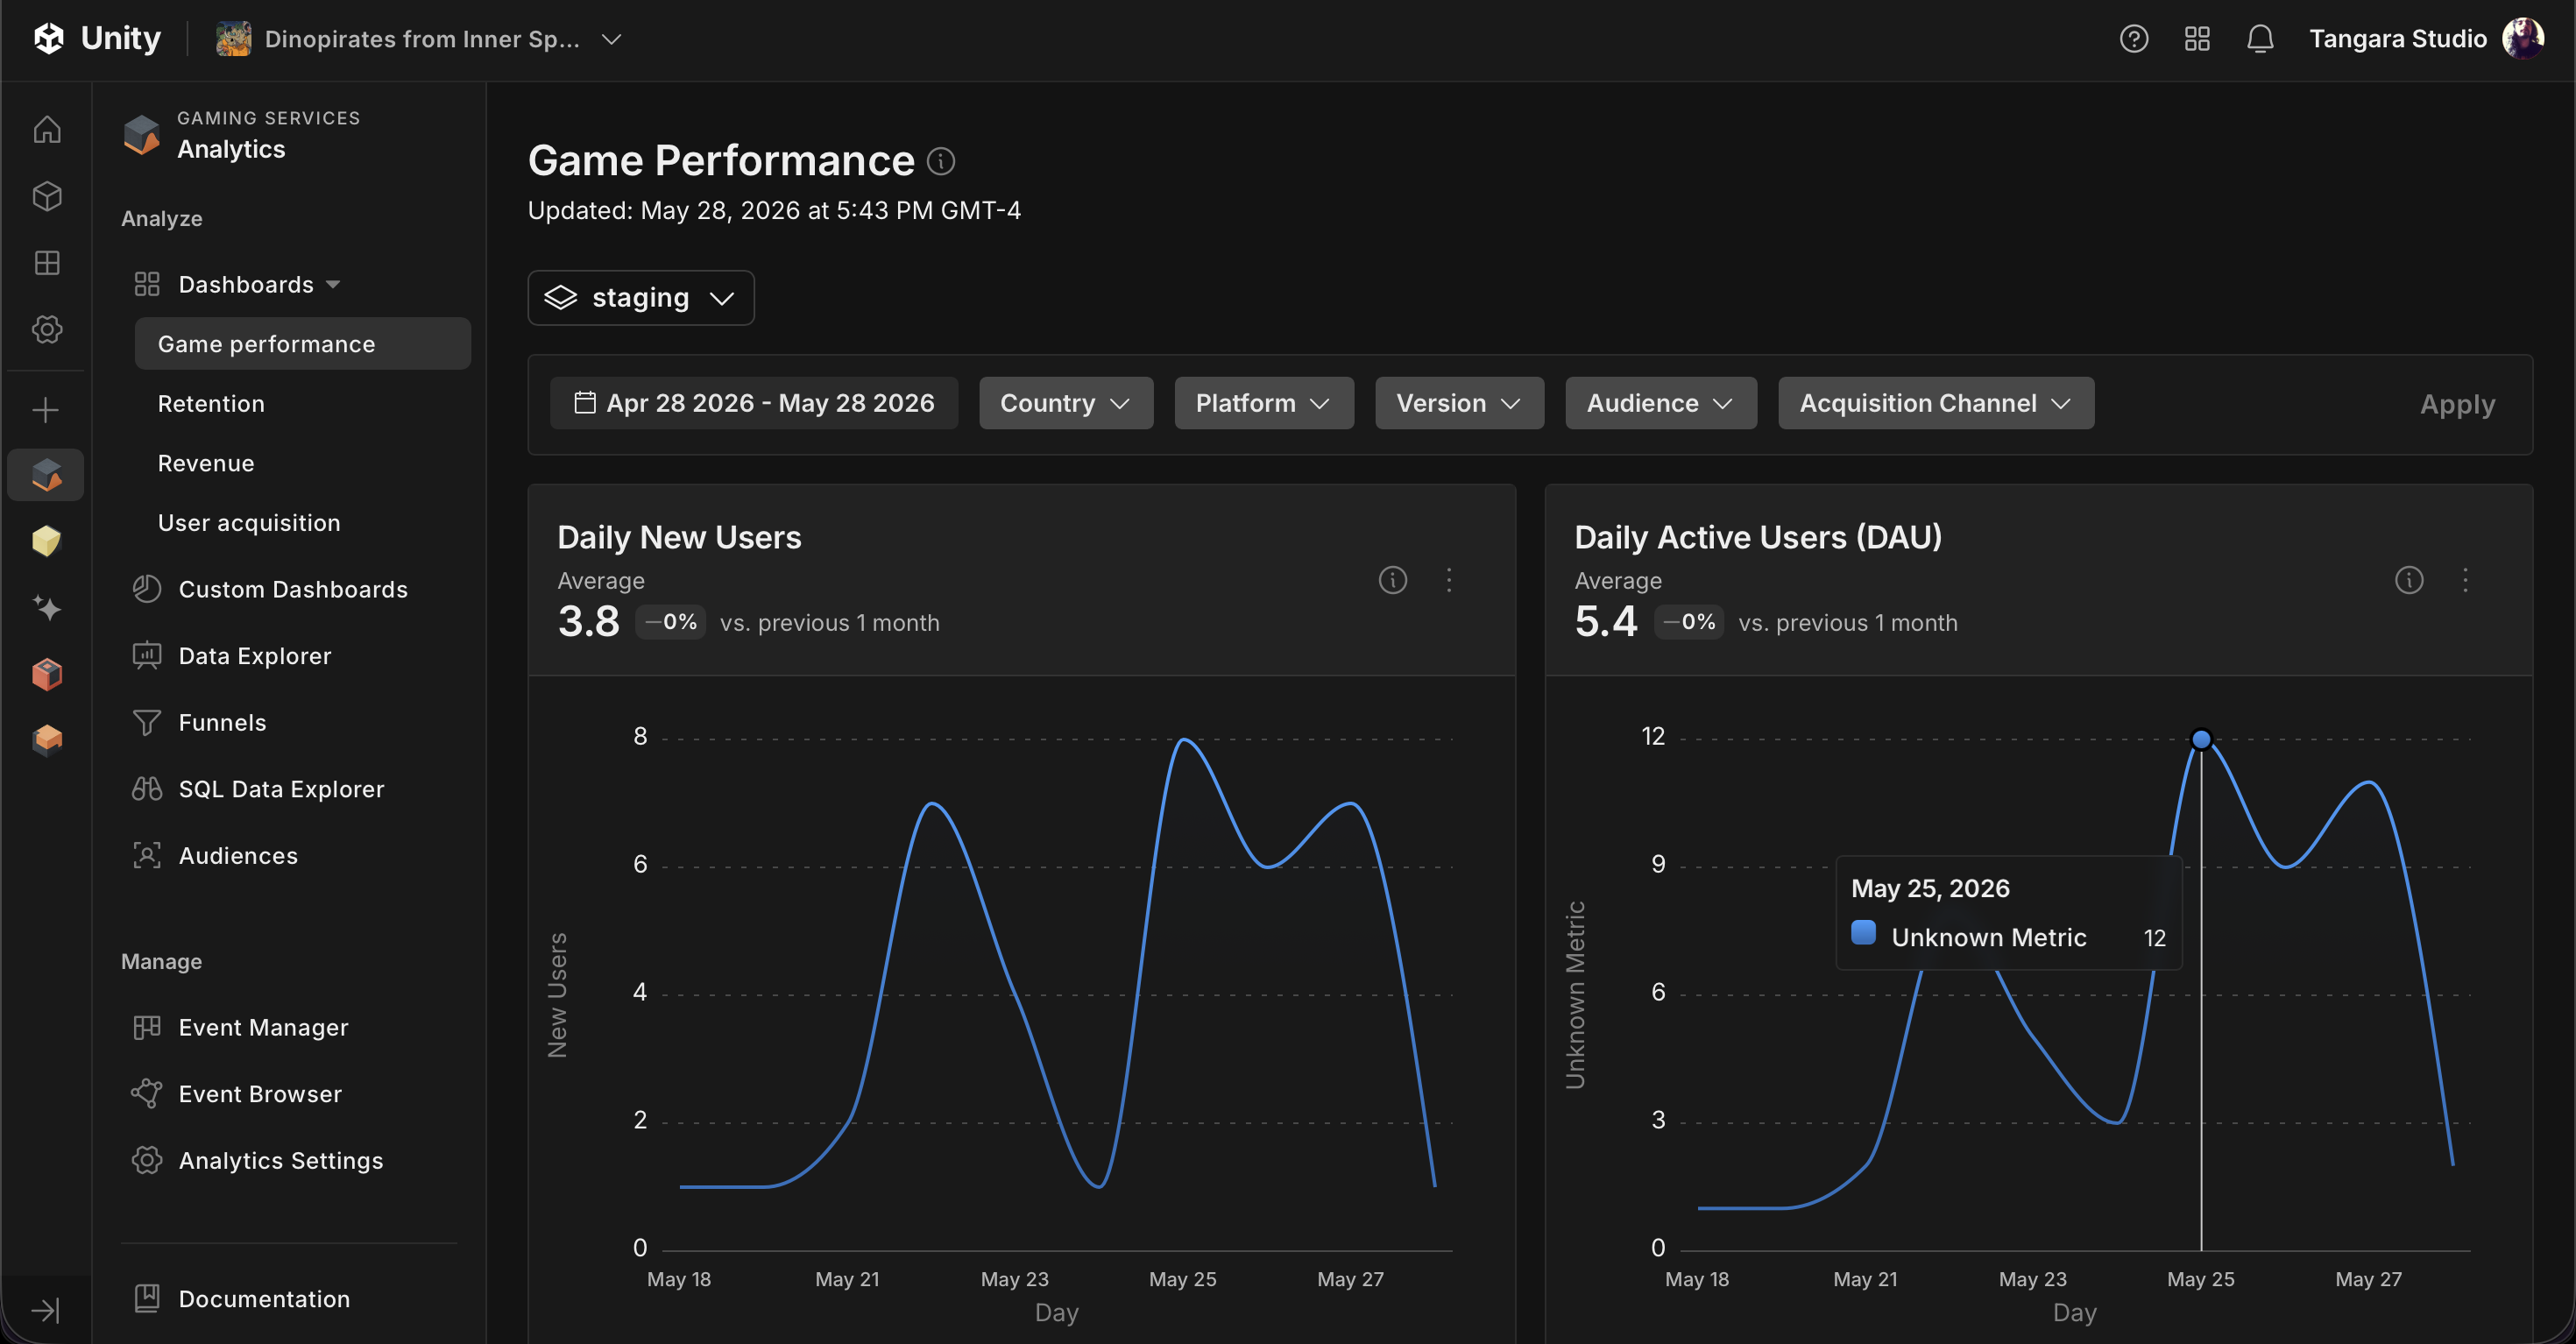
For Countries, Operating Systems, or Hardware data, you need to generate custom reports.
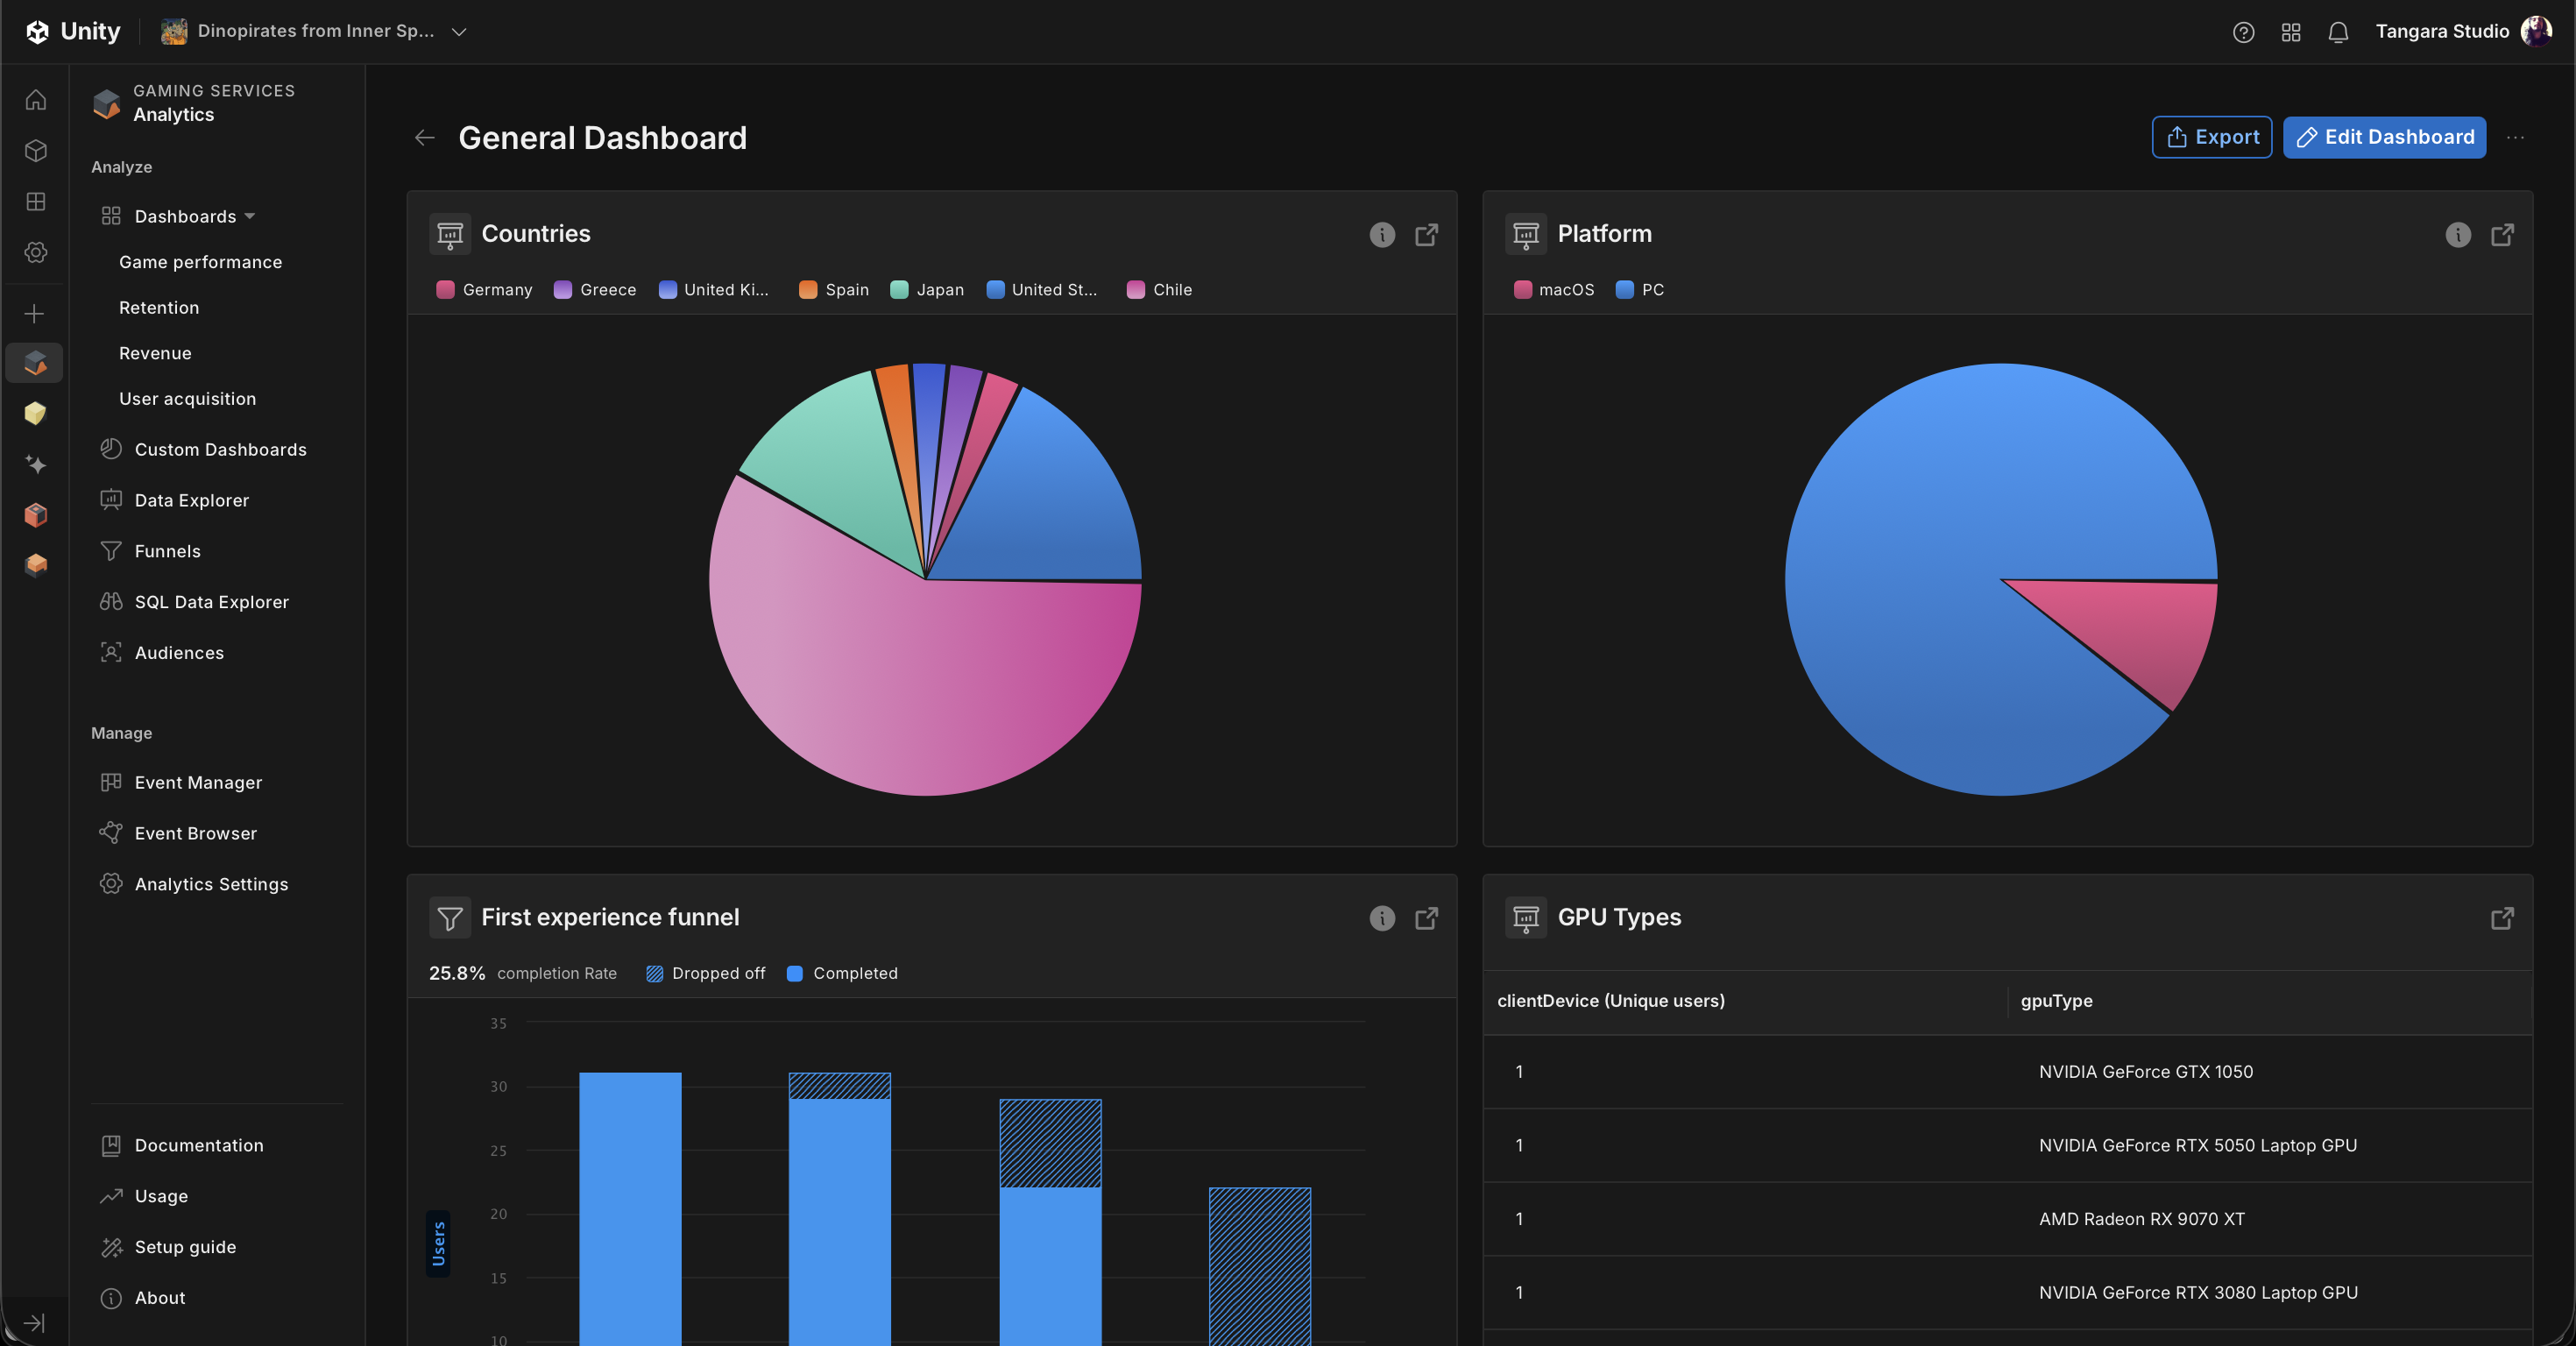
As an example, here are all the parameters stored in the clientDevice event. As you’ll notice, there’s a lot of other valuable information available, such as RAM state, screen resolution, or timezone. It’s important to review what data the SDK already provides before adding custom parameters that could be redundant.
{
  "batteryLoad": 1,
  "buildGUUID": "2c82e431b0ec48d6807d4XXXXXXXXX",
  "clientVersion": "0.1",
  "collectInsertedTimestamp": "2026-05-28 20:45:45.309",
  "cpuCores": 16,
  "cpuType": "AMD Ryzen Z1 Extreme",
  "eventDate": "2026-05-28 00:00:00.000",
  "eventID": 3526528638864123123,
  "eventLevel": 0,
  "eventName": "clientDevice",
  "eventTimestamp": "2026-05-28 20:45:44.966",
  "eventUUID": "XXXXXXXX-XXXX-XXXX-XXXX-XXXXXXXXXXXX",
  "eventVersion": 1,
  "gaUserAcquisitionChannel": "None",
  "gaUserAgeGroup": "UNKNOWN",
  "gaUserCountry": "CL",
  "gaUserGender": "UNKNOWN",
  "gaUserStartDate": "2026-05-22 00:00:00.000",
  "gpuType": "AMD Ryzen Z1 Extreme (RADV PHOENIX)",
  "idfv": "de824a99e67b1d937c83a0c1ce68b87XXXXXXXXX",
  "mainEventID": 352652863886123123,
  "msSinceLastEvent": 28,
  "platform": "PC_CLIENT",
  "projectID": "XXXXXXXX-XXXX-XXXX-XXXX-XXXXXXXXXXXX",
  "ramTotal": 11645,
  "screenHeight": 1080,
  "screenResolution": 96,
  "screenWidth": 1920,
  "sdkMethod": "com.unity.services.analytics.Events.Startup",
  "sessionID": "XXXXXXXX-XXXX-XXXX-XXXX-XXXXXXXXXXXX",
  "timezoneOffset": "-0400",
  "unityInstallationID": "XXXXXXXX-XXXX-XXXX-XXXX-XXXXXXXXXXXX",
  "userCountry": "CL",
  "userID": "XXXXXXXX-XXXX-XXXX-XXXX-XXXXXXXXXXXX"
}
With the base up and running, the next step is defining the events that matter for your specific game. That’s what the next article covers: custom events, how to structure them in code, and how to build the funnel in the Dashboard.
Series: Analytics, you can check the other parts here pt1 and pt3