
Analytics pt 3: Custom events and conversion funnels

Header photo by Paulo Gustavo Modesto
With Unity Analytics initialized and user consent handled correctly, you already get session and hardware data with no extra effort. But to answer the questions that matter for your design —do players reach the second Raid? Which biome is hardest? How many die before understanding the loop?— you need custom events.
This article covers how to think about, implement, and visualize those events. All the code shown is what we use in production on Dinopirates.
First: define what to measure
Before writing any code, you need to be clear on what the conversion events of the game are. These are the milestones that mark real player progress through the experience.
The question that guides that definition: what has to happen for us to consider that a player “understood” the game?
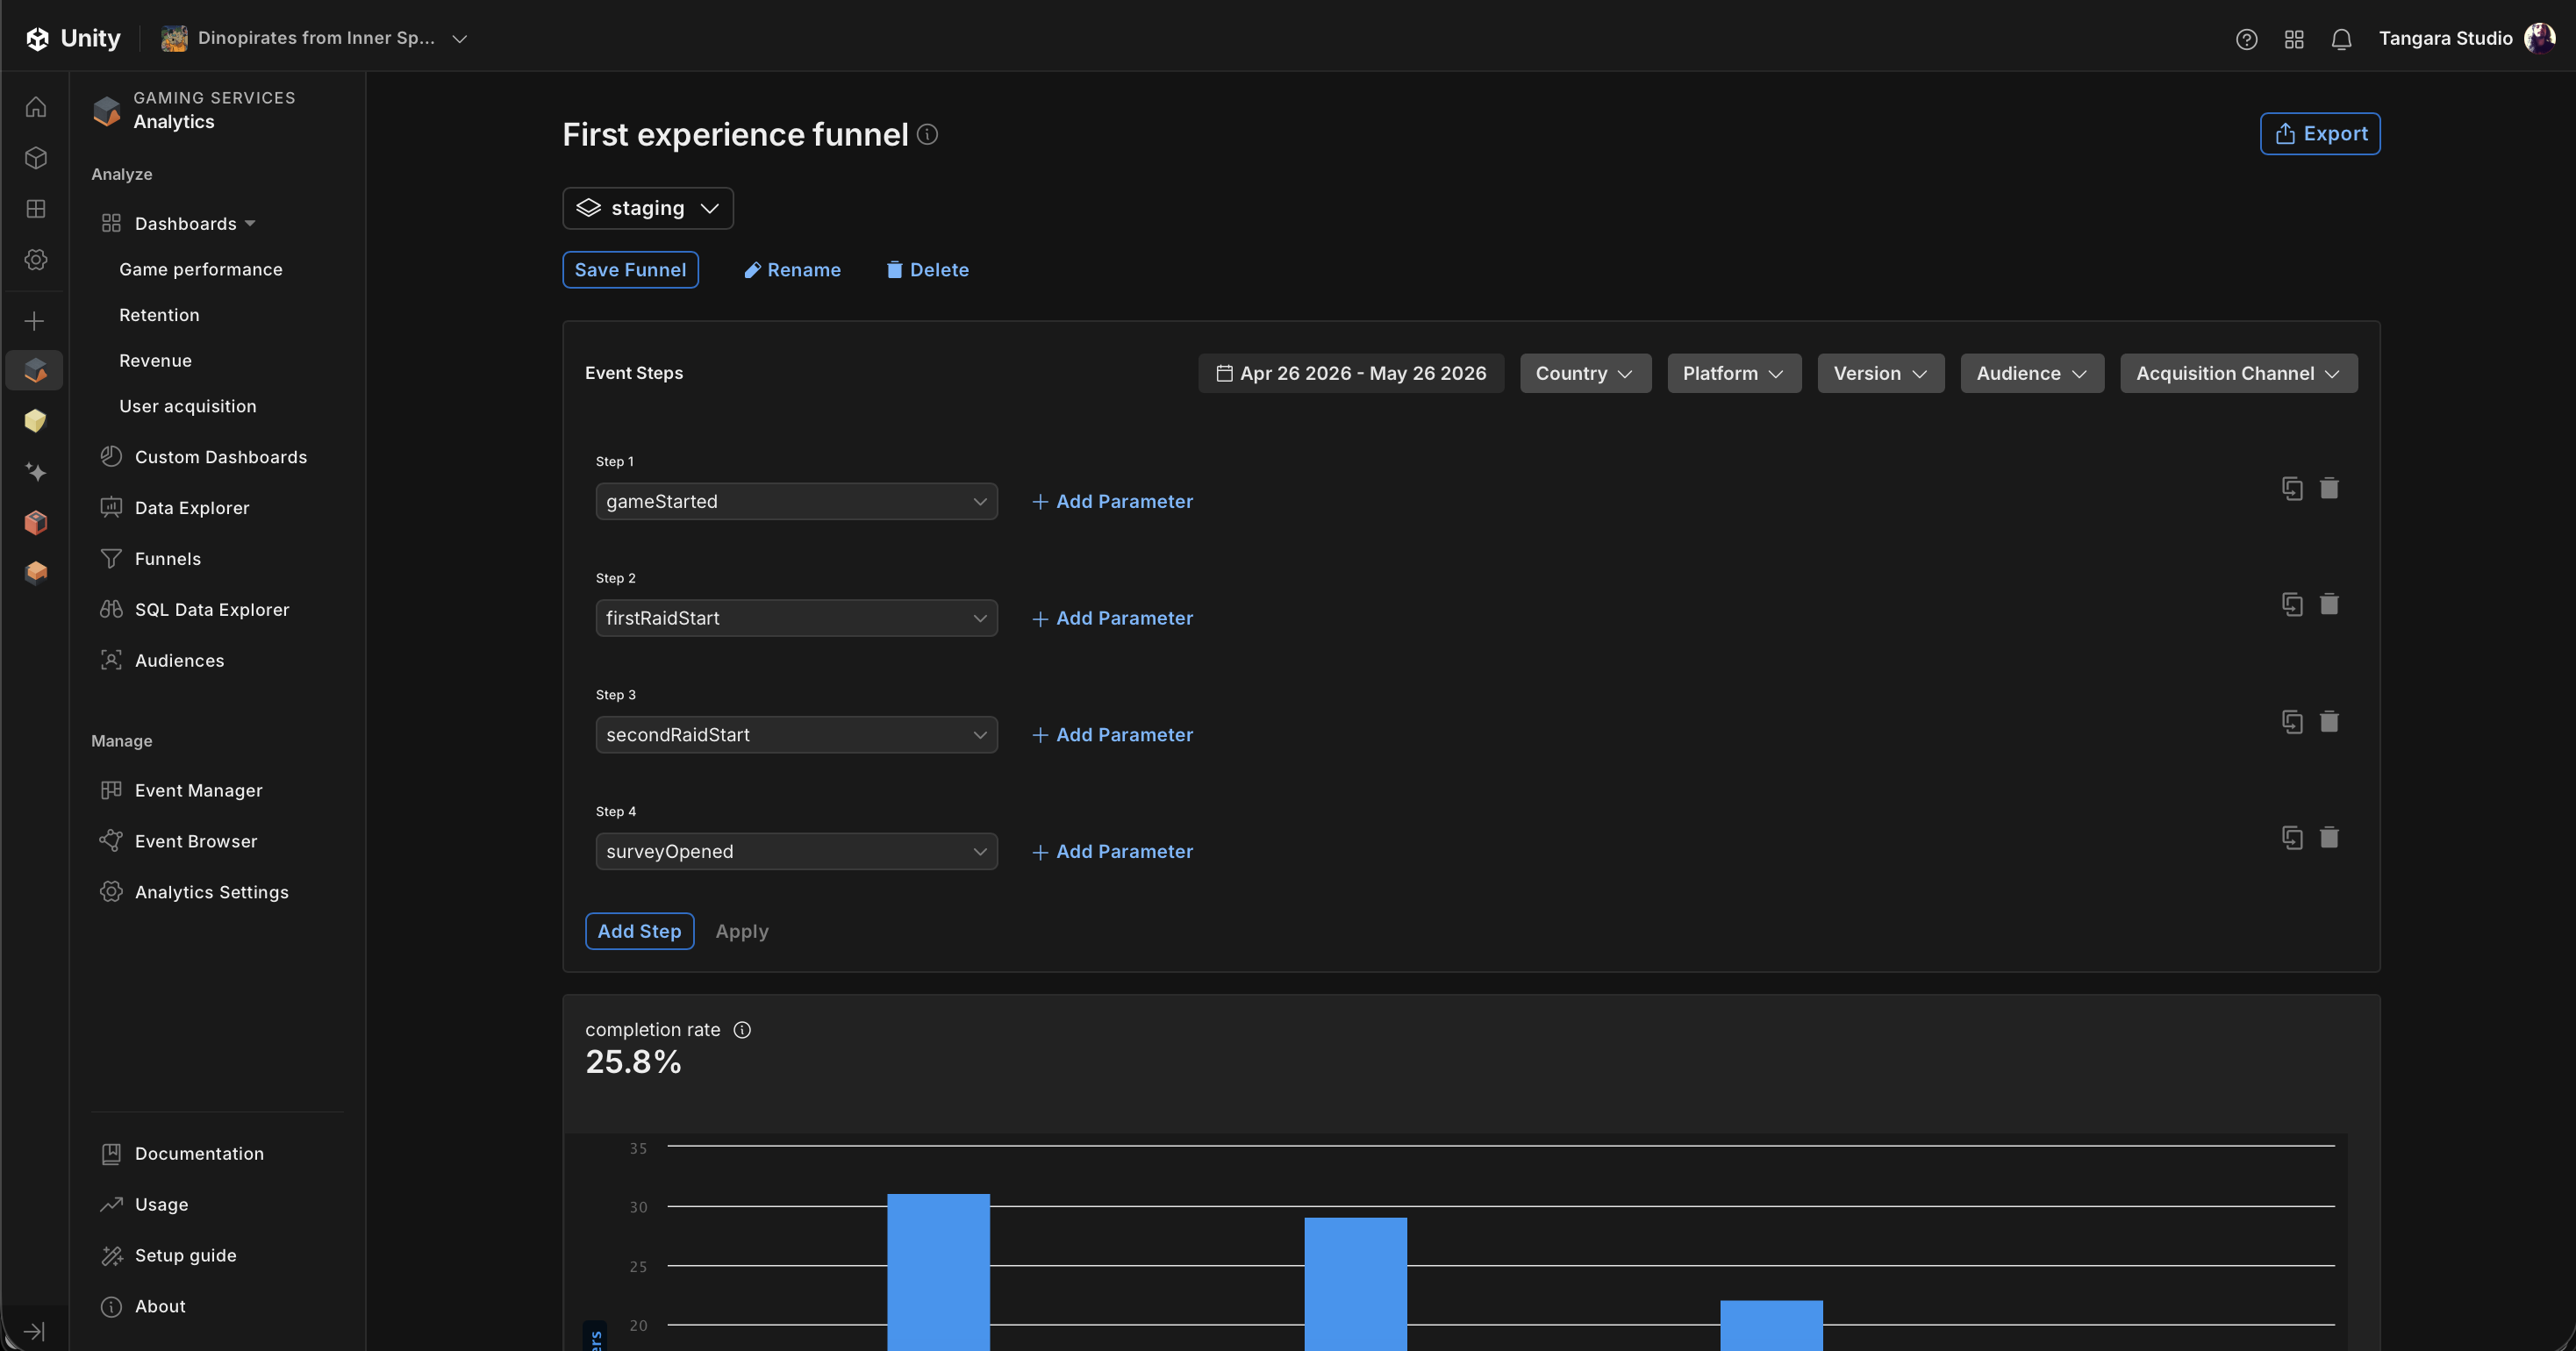
For the Dinopirates Playtest, we defined a four-step funnel:
gameStarted → firstRaidStart → secondRaidStart → surveyOpened- gameStarted: the player opened the game and got past the initial screen. Native to Unity, requires no code.
- firstRaidStart: they decided to enter their first Raid. Indicates that onboarding worked well enough.
- secondRaidStart: they died in their first Raid and came back to try again. This is the most revealing milestone of the core loop.
- surveyOpened: they reached the point of filling out the Playtest survey. Our final conversion event.
That funnel, with four events, already lets us measure the health of the entire Playtest.
In addition to the funnel, there are other context events that add useful information without being part of the conversion sequence: playerDeath, raidCompleted, raidAbandoned, nextFloorEntered, buyWeapon, openChest, among others.
What is a custom event and what are its parameters
A custom event is a message your game sends to Unity Analytics when something specific happens. It has a name that identifies it and can have parameters: additional data that describes the context in which it occurred.
For example, the playerDeath event on its own tells you someone died. But with parameters, it tells you when they died, in which biome, with what difficulty, and how long they had been playing that Raid. That difference is what turns an event into actionable information.
For Dinopirates, we defined a class hierarchy of events that accumulate parameters according to context:
DPBaseEvent          → TotalPlayTime
└── DPBaseSlotEvent  → + SlotPlayTime, GoldCoinsPoints, CrewMembersPoints, DinopirateLevel
    └── DPBaseRaidEvent → + Biome, Difficulty
        └── DPBaseRaidEndEvent → + WeaponUsed, RaidDurationSeconds, EnemiesKilled, ...
This allows richer events (like raidCompleted) to automatically inherit all base parameters without repeating code, while simpler events (like surveyOpened) only carry what they need.
Code implementation
The event classes
Each event is a class that inherits from the base class corresponding to its context. All of these classes are organized in a file called DPAnalyticsEvents.
Unity Analytics uses this pattern to type the parameters in the SDK. Below are the base classes from which all other events inherit.
// DPAnalyticsEvents.cs

// Base event with global session parameters
public class DPBaseEvent : Event
{
    public DPBaseEvent(string eventName) : base(eventName)
    {
    }

    public int TotalPlayTime { set { SetParameter("totalPlayTime", value); } }
}

// Base classes for gameplay events, with common parameters to track in each event.
public class DPBaseSlotEvent : DPBaseEvent
{
    public DPBaseSlotEvent(string eventName) : base(eventName)
    {
    }

    public int SlotPlayTime { set { SetParameter("slotPlayTime", value); } }
    public int GoldCoinsPoints { set { SetParameter("goldCoinsPoints", value); } }
    public int CrewMembersPoints { set { SetParameter("crewMembersPoints", value); } }
    public int DinopirateLevel { set { SetParameter("dinopirateLevel", value); } }
}

// Base class for Raid-related events, with parameters specific to this type.
public class DPBaseRaidEvent : DPBaseSlotEvent
{
    public DPBaseRaidEvent(string eventName) : base(eventName)
    {
    }

    public string Biome { set { SetParameter("biome", value); } }
    public string Difficulty { set { SetParameter("difficulty", value); } }
}

// Base class for Raid-end events (completed, abandoned, or escaped) with full session context.
public class DPBaseRaidEndEvent : DPBaseRaidEvent
{
    public DPBaseRaidEndEvent(string eventName) : base(eventName) { }

    public string WeaponUsed { set { SetParameter("weaponUsed", value); } }
    public int UnlockedBlueprints { set { SetParameter("unlockedBlueprints", value); } }
    public int ComponentsUsed { set { SetParameter("componentsUsed", value); } }
    public int RaidDurationSeconds { set { SetParameter("raidDurationSeconds", value); } }
    public int EnemiesKilled { set { SetParameter("enemiesKilled", value); } }
    public int CrewMembersRescued { set { SetParameter("crewMembersRescued", value); } }
}
Here are some inheritance examples for specific events:
// DPAnalyticsEvents.cs

// Simple event: only needs global play time
public class DPSurveyOpenedEvent : DPBaseEvent
{
    public DPSurveyOpenedEvent() : base("surveyOpened") { }
}

// Raid event: inherits biome and difficulty in addition to slot parameters
public class DPPlayerDeathEvent : DPBaseRaidEvent
{
    public DPPlayerDeathEvent() : base("playerDeath") { }
}

// Raid-end event: full session context
public class DPRaidCompletedEvent : DPBaseRaidEndEvent
{
    public DPRaidCompletedEvent() : base("raidCompleted") { }
}
The idea is to identify parameters that can be shared across events. With proper planning, it will be much easier to include them in the Unity Dashboard.
The centralized sender
To avoid calling AnalyticsService.Instance.RecordEvent() scattered throughout the project, we concentrate all sending logic in a static class called DPAnalyticsSender. Each method in that class is responsible for assembling the event with the correct parameters and verifying that consent is active before sending:
public static class DPAnalyticsSender
{
    // Guard: only sends if the player gave consent
    static bool CanSend =>
        TSAnalyticsManager.HasInstance &&
        TSAnalyticsManager.Instance.CurrentAnalyticConsent == TSAnalyticConsent.Granted;

    public static void TrackFirstRaidStart()
    {
        if (!CanSend) return;
        var e = new DPFirstRaidStartEvent();
        ApplySlotParams(e);   // Applies GoldCoins, CrewMembers, DinopirateLevel, etc.
        AnalyticsService.Instance.RecordEvent(e);
    }

    public static void TrackRaidCompleted(DPRaidRecord record, string weaponUsed,
                                          int unlockedBlueprints = 0, int componentsUsed = 0)
    {
        if (!CanSend || record == null) return;
        var e = new DPRaidCompletedEvent
        {
            WeaponUsed          = weaponUsed,
            RaidDurationSeconds = Mathf.FloorToInt(record.DurationSeconds),
            EnemiesKilled       = record.KilledEnemyNames?.Count ?? 0,
            CrewMembersRescued  = record.CrewMembersEarned,
            UnlockedBlueprints  = unlockedBlueprints,
            ComponentsUsed      = componentsUsed,
        };
        ApplyRaidParams(e);   // Applies Biome, Difficulty, and all slot parameters
        AnalyticsService.Instance.RecordEvent(e);
    }
}
Call sites throughout the rest of the game stay clean. When a player completes a Raid:
DPAnalyticsSender.TrackRaidCompleted(raidRecord, currentWeapon.Name,
                                     blueprintsUnlocked, componentsActive);
One line, no direct coupling to AnalyticsService.
Debug logging in development
One addition worth including from the start: conditional logging that only activates in development builds. It lets you verify that events are firing correctly without needing to open the Dashboard:
static void Log(string eventName, string details = "")
{
#if UNITY_EDITOR || DEVELOPMENT_BUILD
    string consent = CanSend ? "" : " [NO CONSENT]";
    Debug.Log($"[Analytics]{consent} {eventName} | {details}");
#endif
}
Each send method calls Log() before the consent guard, so you can see in the console what was attempted even when consent is denied — useful for testing the flow without contaminating real data.
Configuring events in Unity Dashboard
Once the code is ready, the Dashboard needs to know about your custom events in order to process them in funnels and reports. This step is frequently skipped and causes events to arrive as “unknown”.
In the Dashboard: Analytics → Event Manager → Add New → Custom Parameter or Custom Event
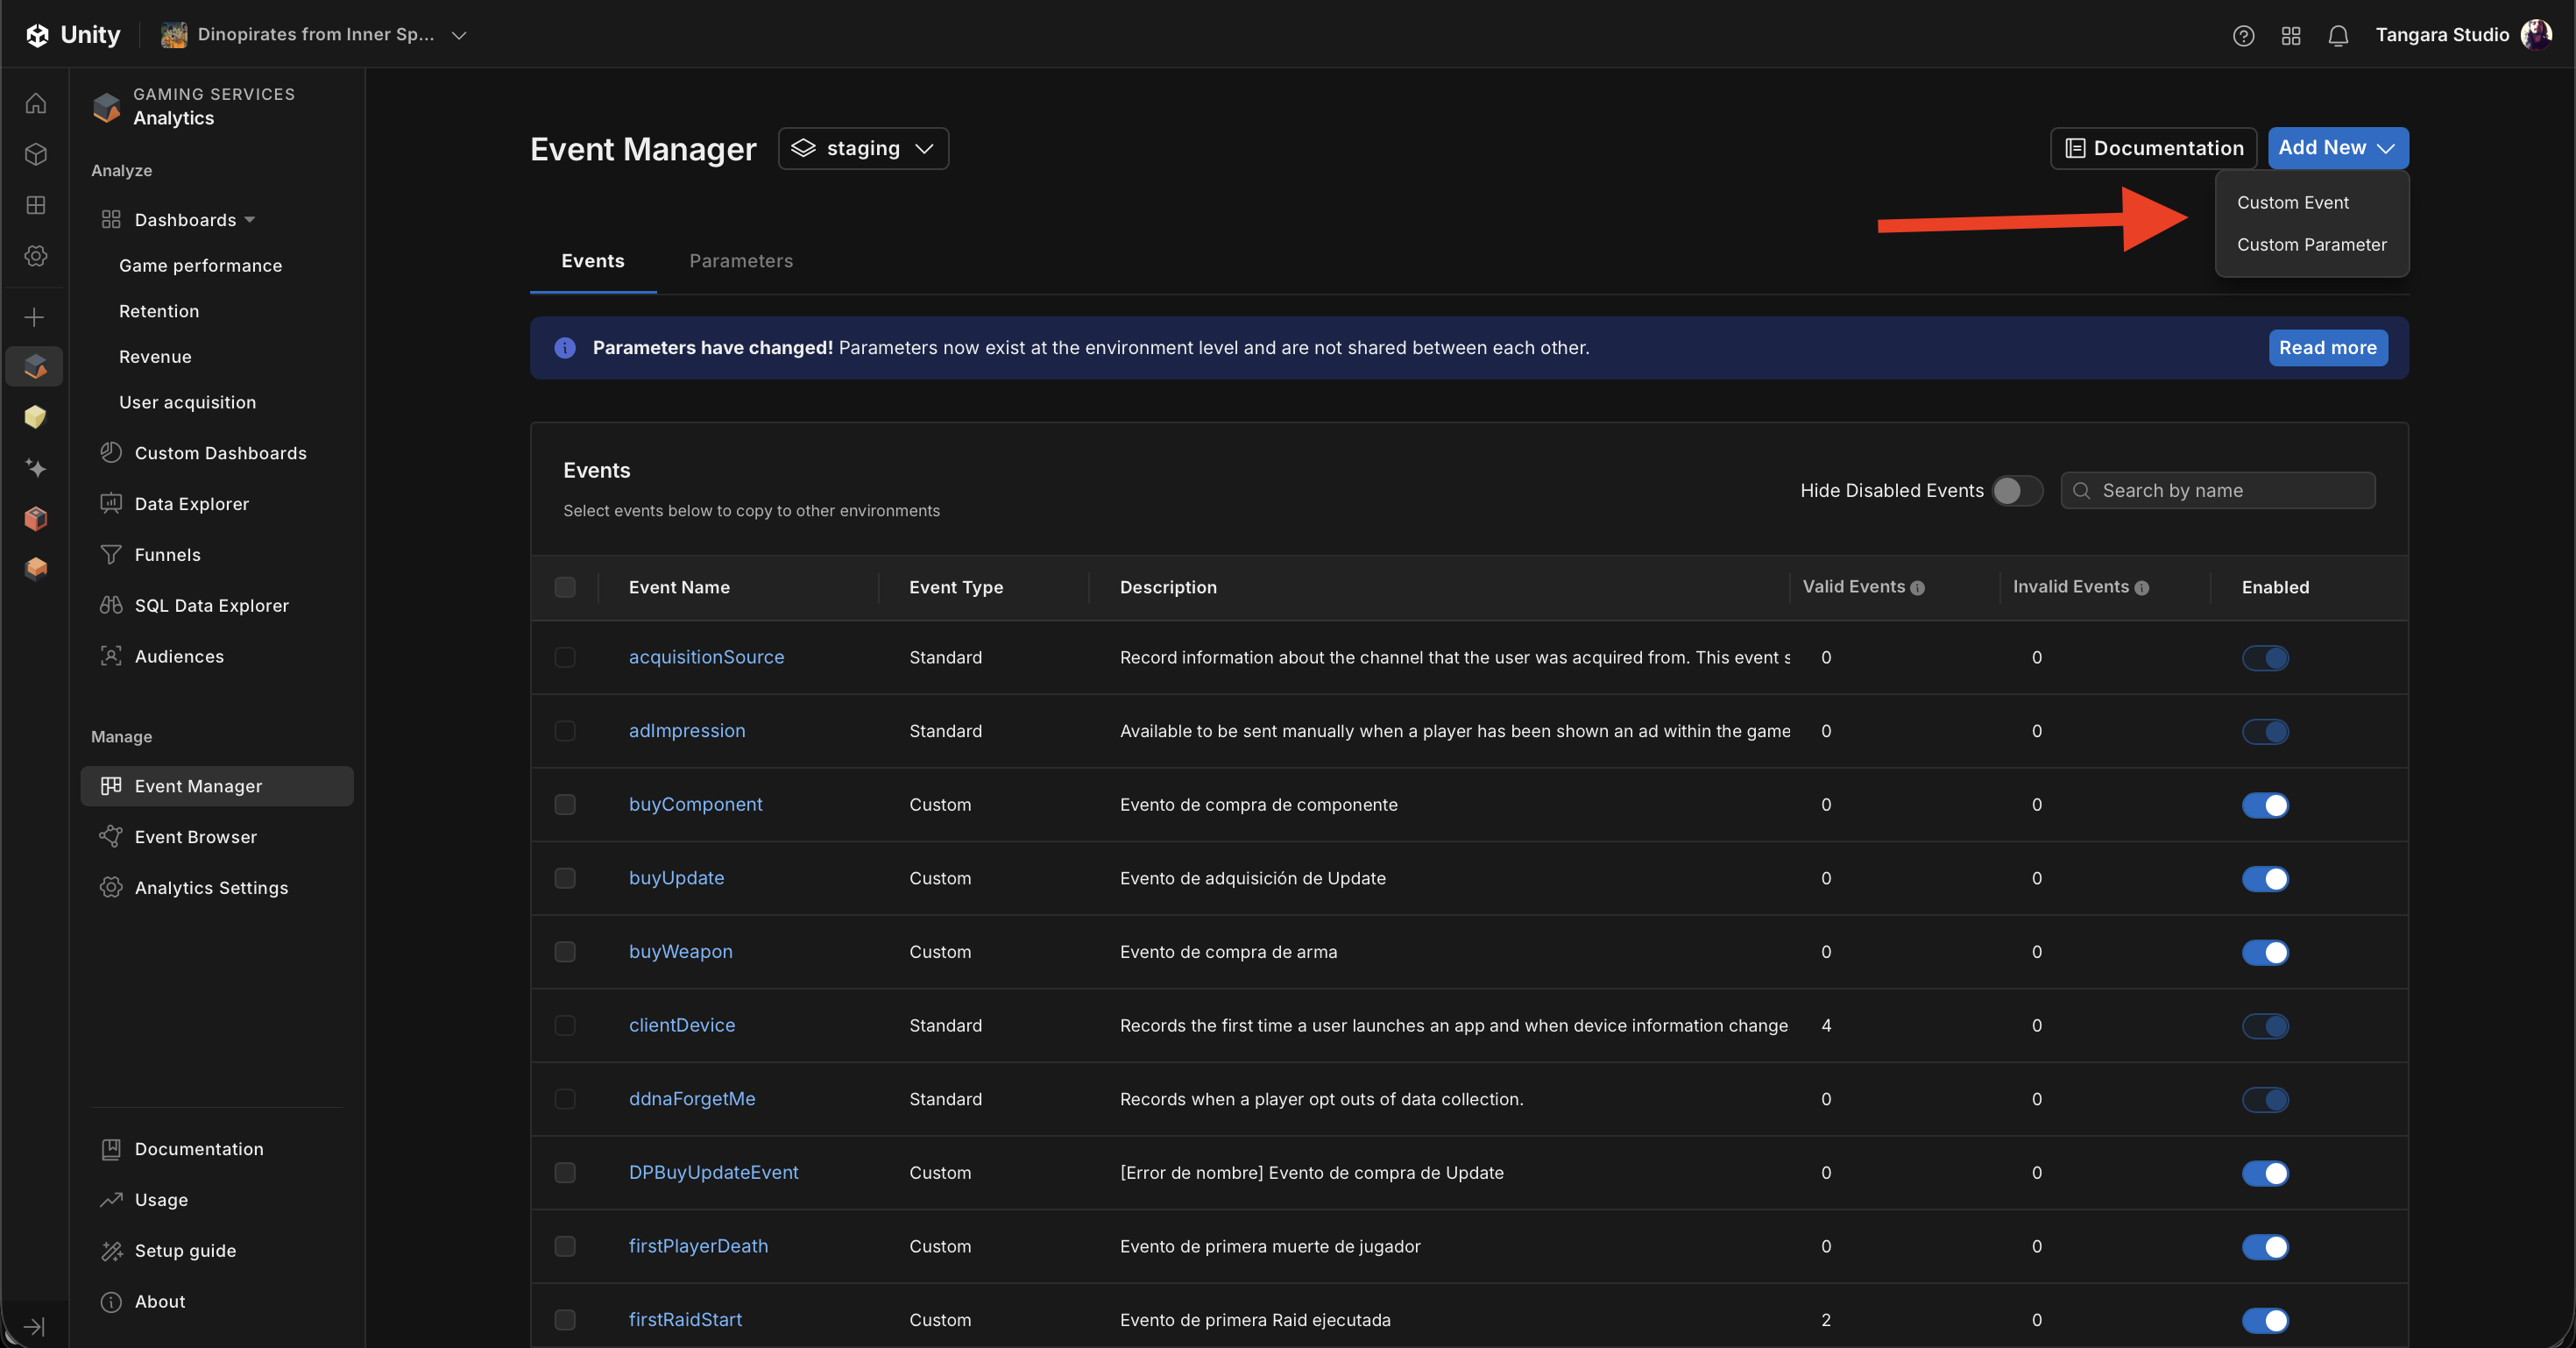
For each event, you must define:
- The exact name (e.g.
playerDeath) — must match character for character with the string in the code (e.g.new DPPlayerDeathEvent() : base("playerDeath")). - Each parameter with its data type (
biome→ String,raidDurationSeconds→ Integer, etc.)
Unity does not automatically validate that the event name in the code matches the one registered in the Dashboard. If there’s a difference, events arrive but can’t be used in funnels.
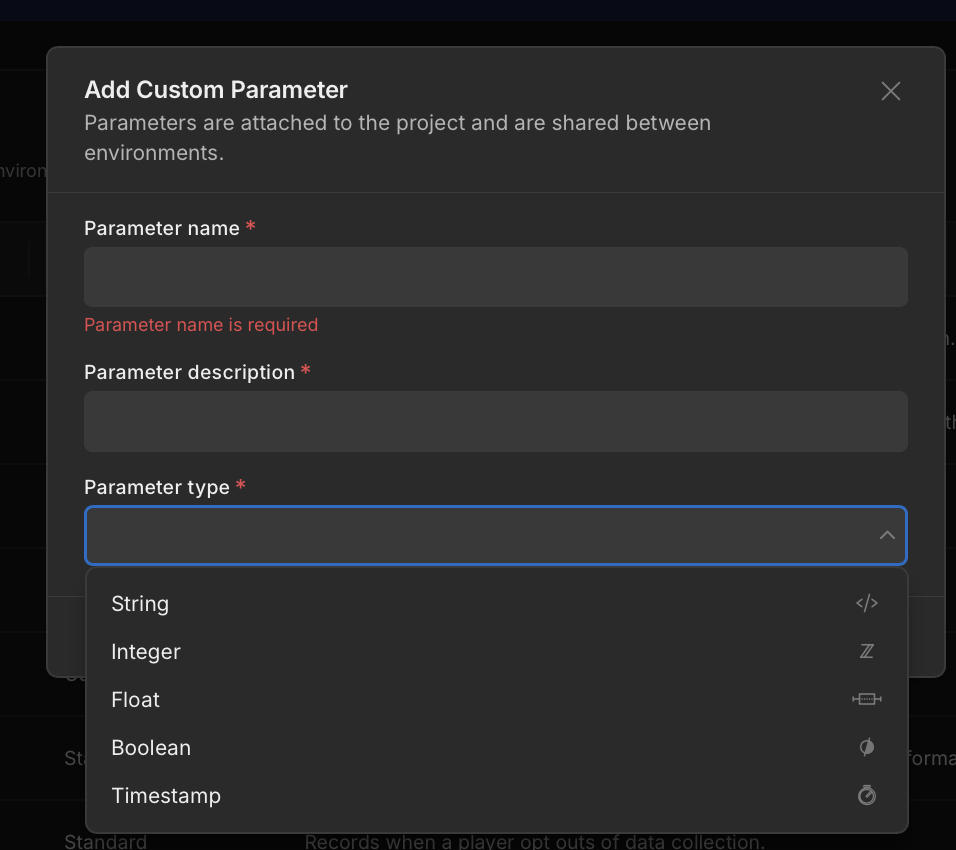
Another important factor is defining concrete data types for each parameter. If an event arrives with a parameter that doesn’t exist or has a different type, that parameter is ignored in the Dashboard. For example, if raidDurationSeconds arrives as a String instead of an Integer, you won’t be able to use it for filtering or segmentation. Some useful types are String, Integer, Float, Boolean, and Timestamp.
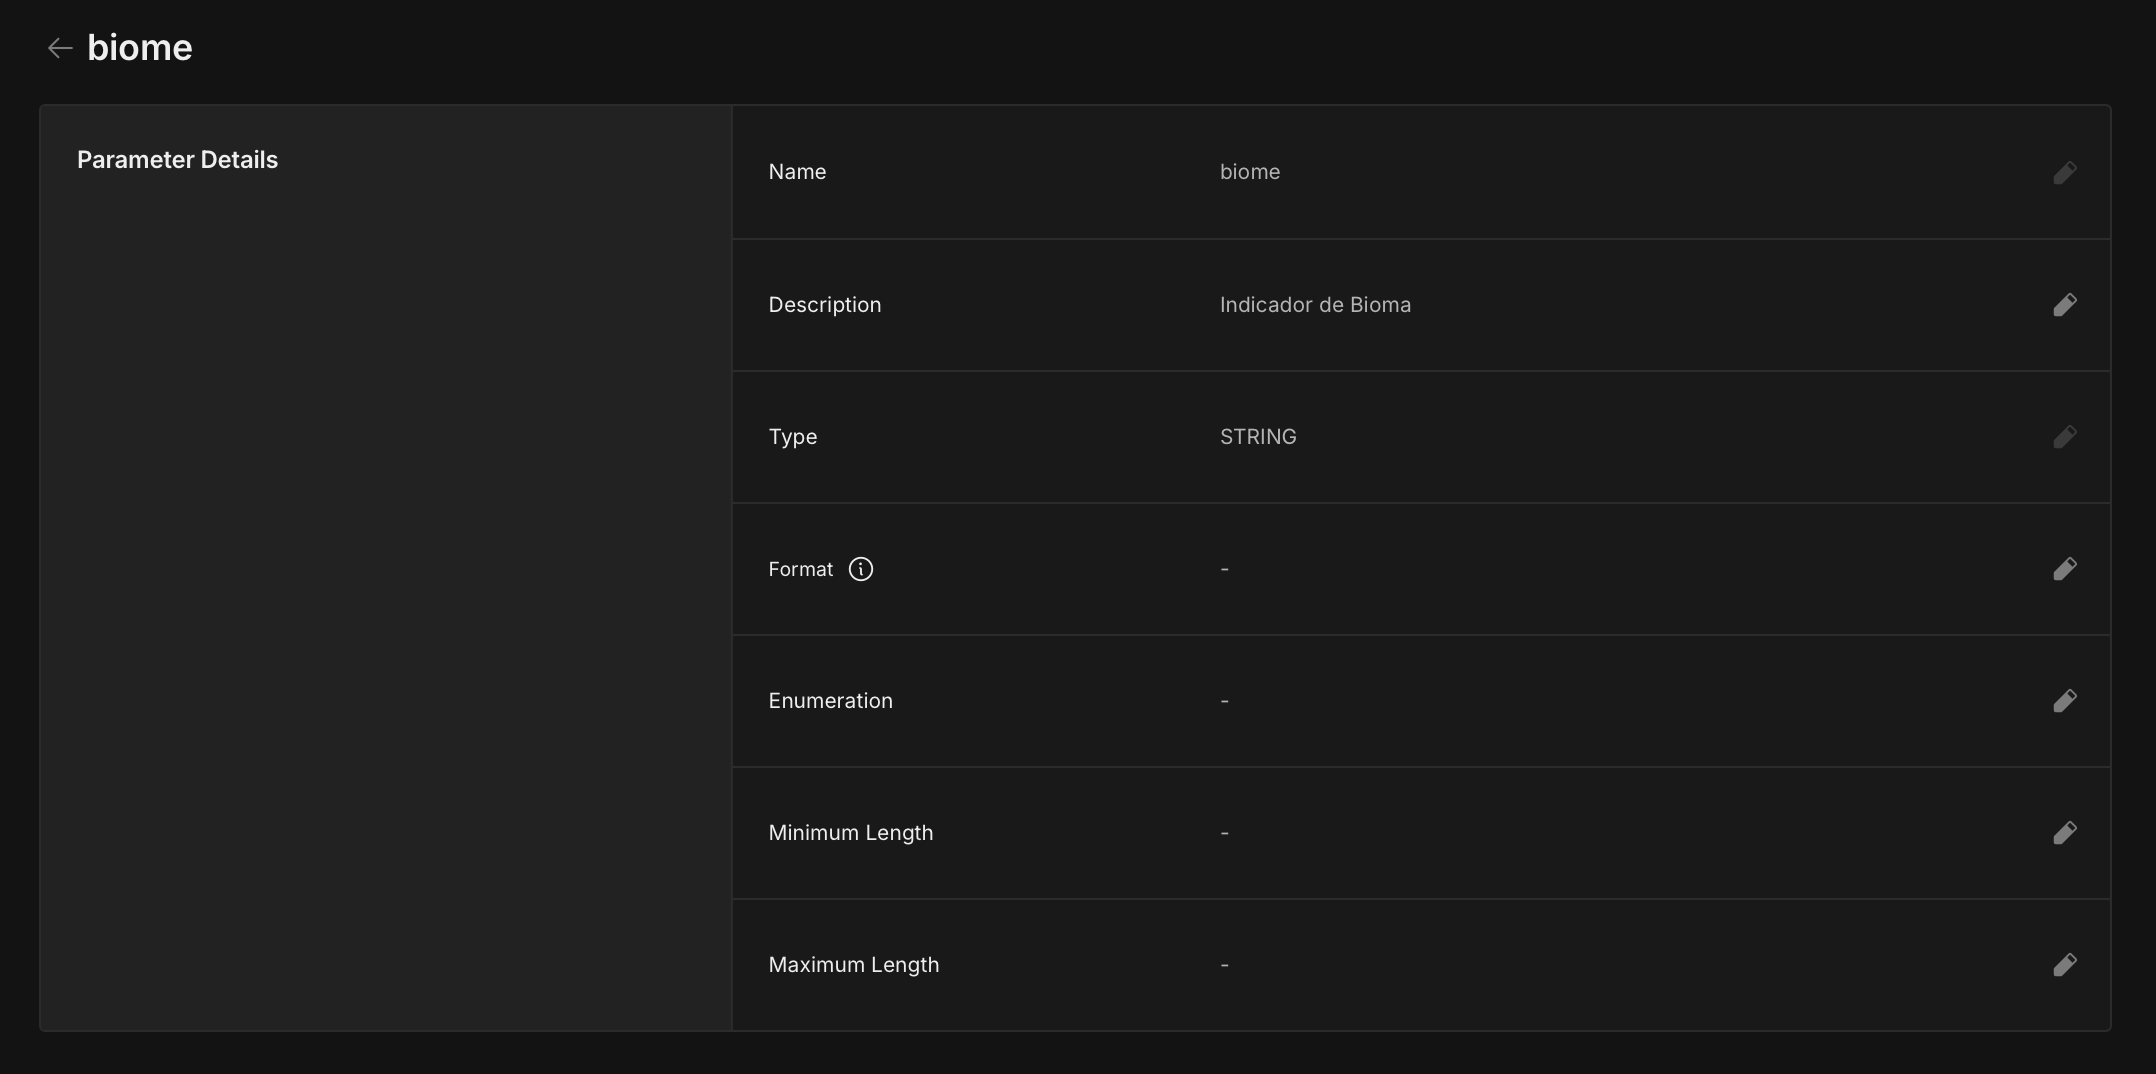
Once an event has been declared, if it’s a String for instance, you can define a format (Regex) or even a set of ENUM values. It’s recommended to get comfortable with raw events before working with restrictions.
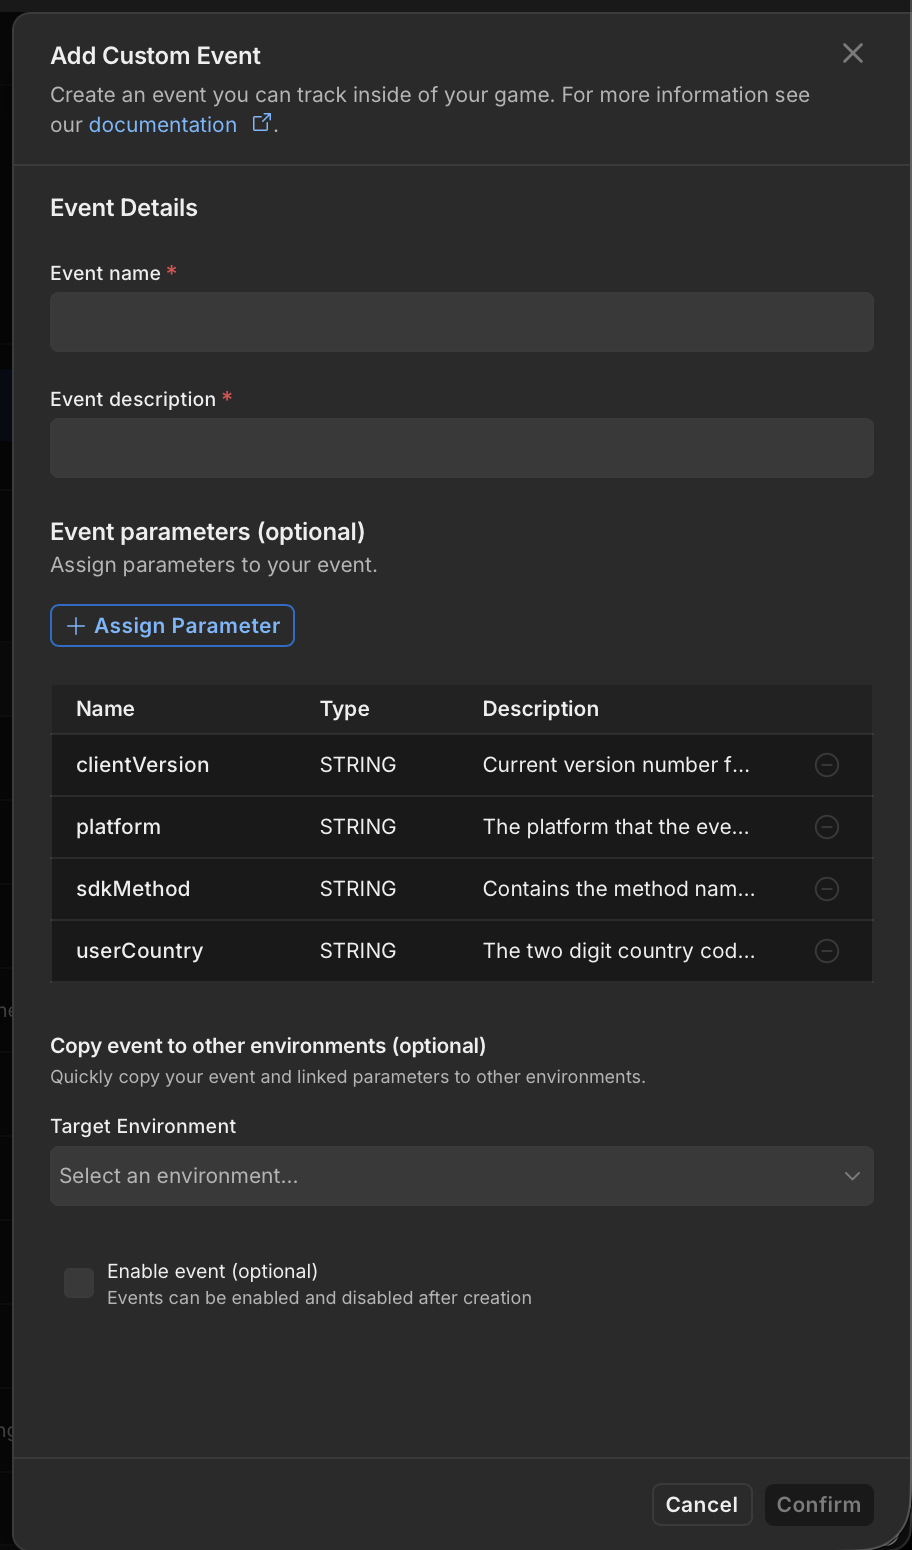
The recommendation is to start by defining parameters and then the events that include them. Since Unity doesn’t allow deleting events or parameters, it’s important to plan carefully which data you actually need, to avoid filling the Dashboard with events that can’t be used.
Likewise, it’s recommended to take advantage of the event generation process to replicate them across all environments at once. Failing to do so means manually recreating events in each environment, which can lead to errors or inconsistencies.
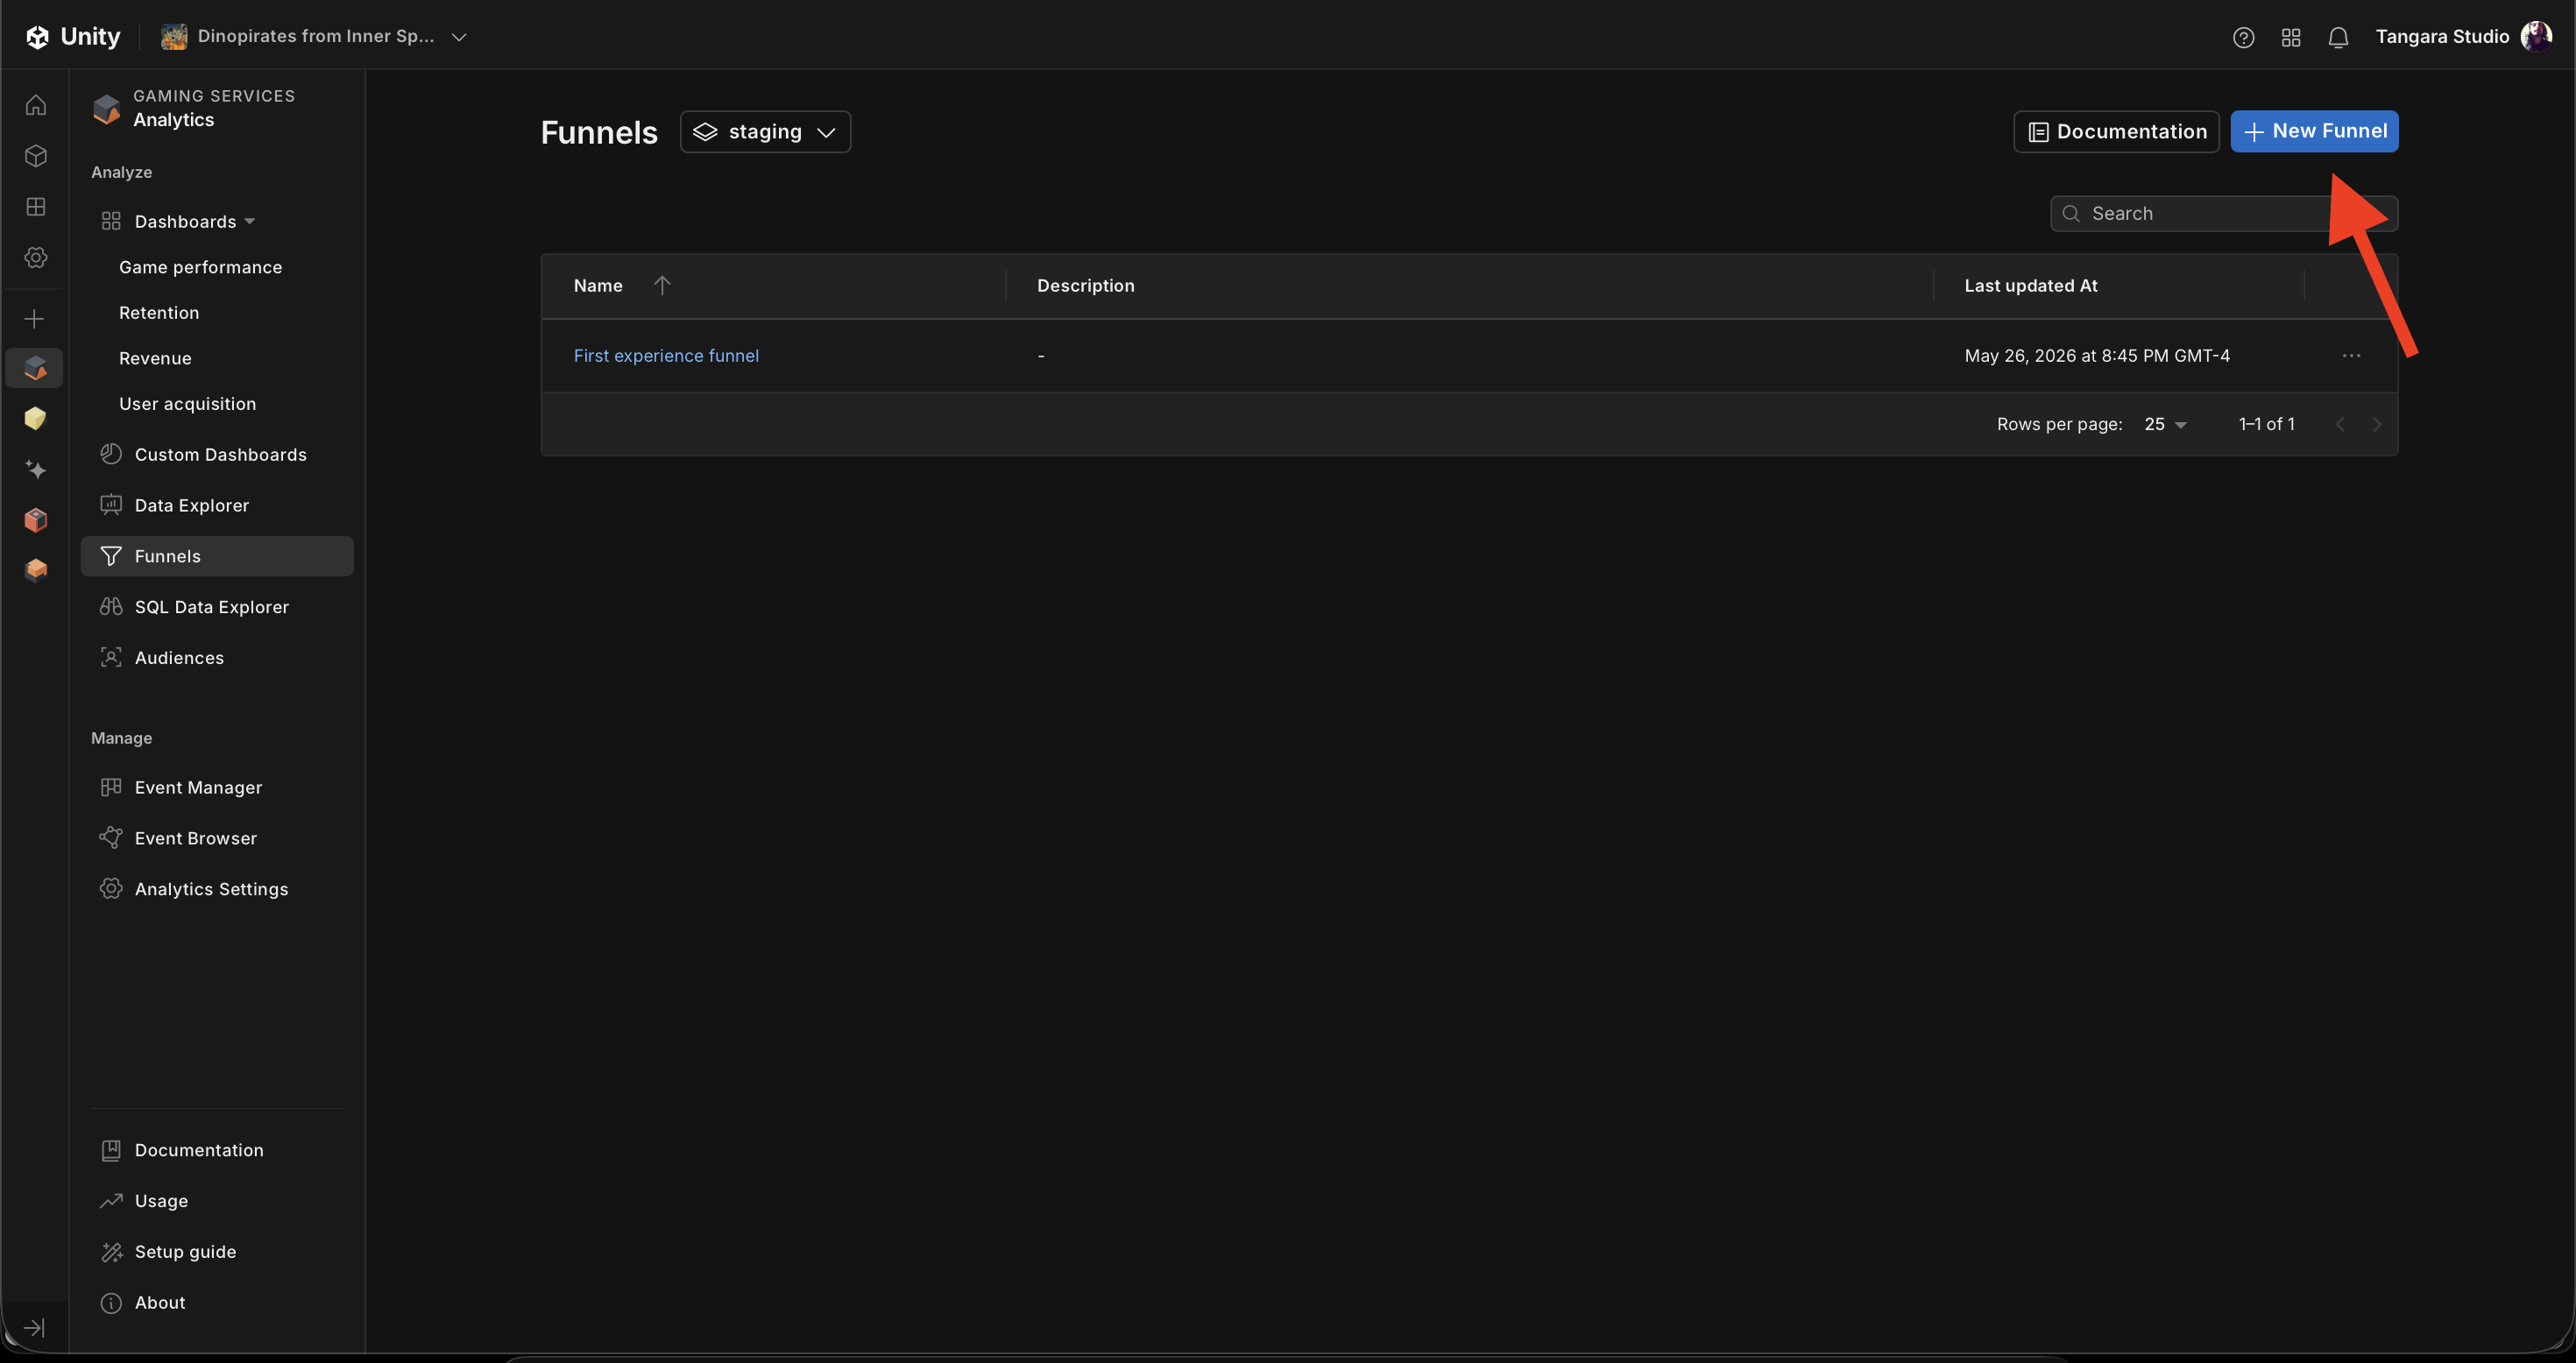
With the events registered, the funnel is built in Analytics → Funnels → New Funnel: select the events in order, define the time window (per session, per day, or unrestricted), and the Dashboard automatically calculates the conversion rates between each step.
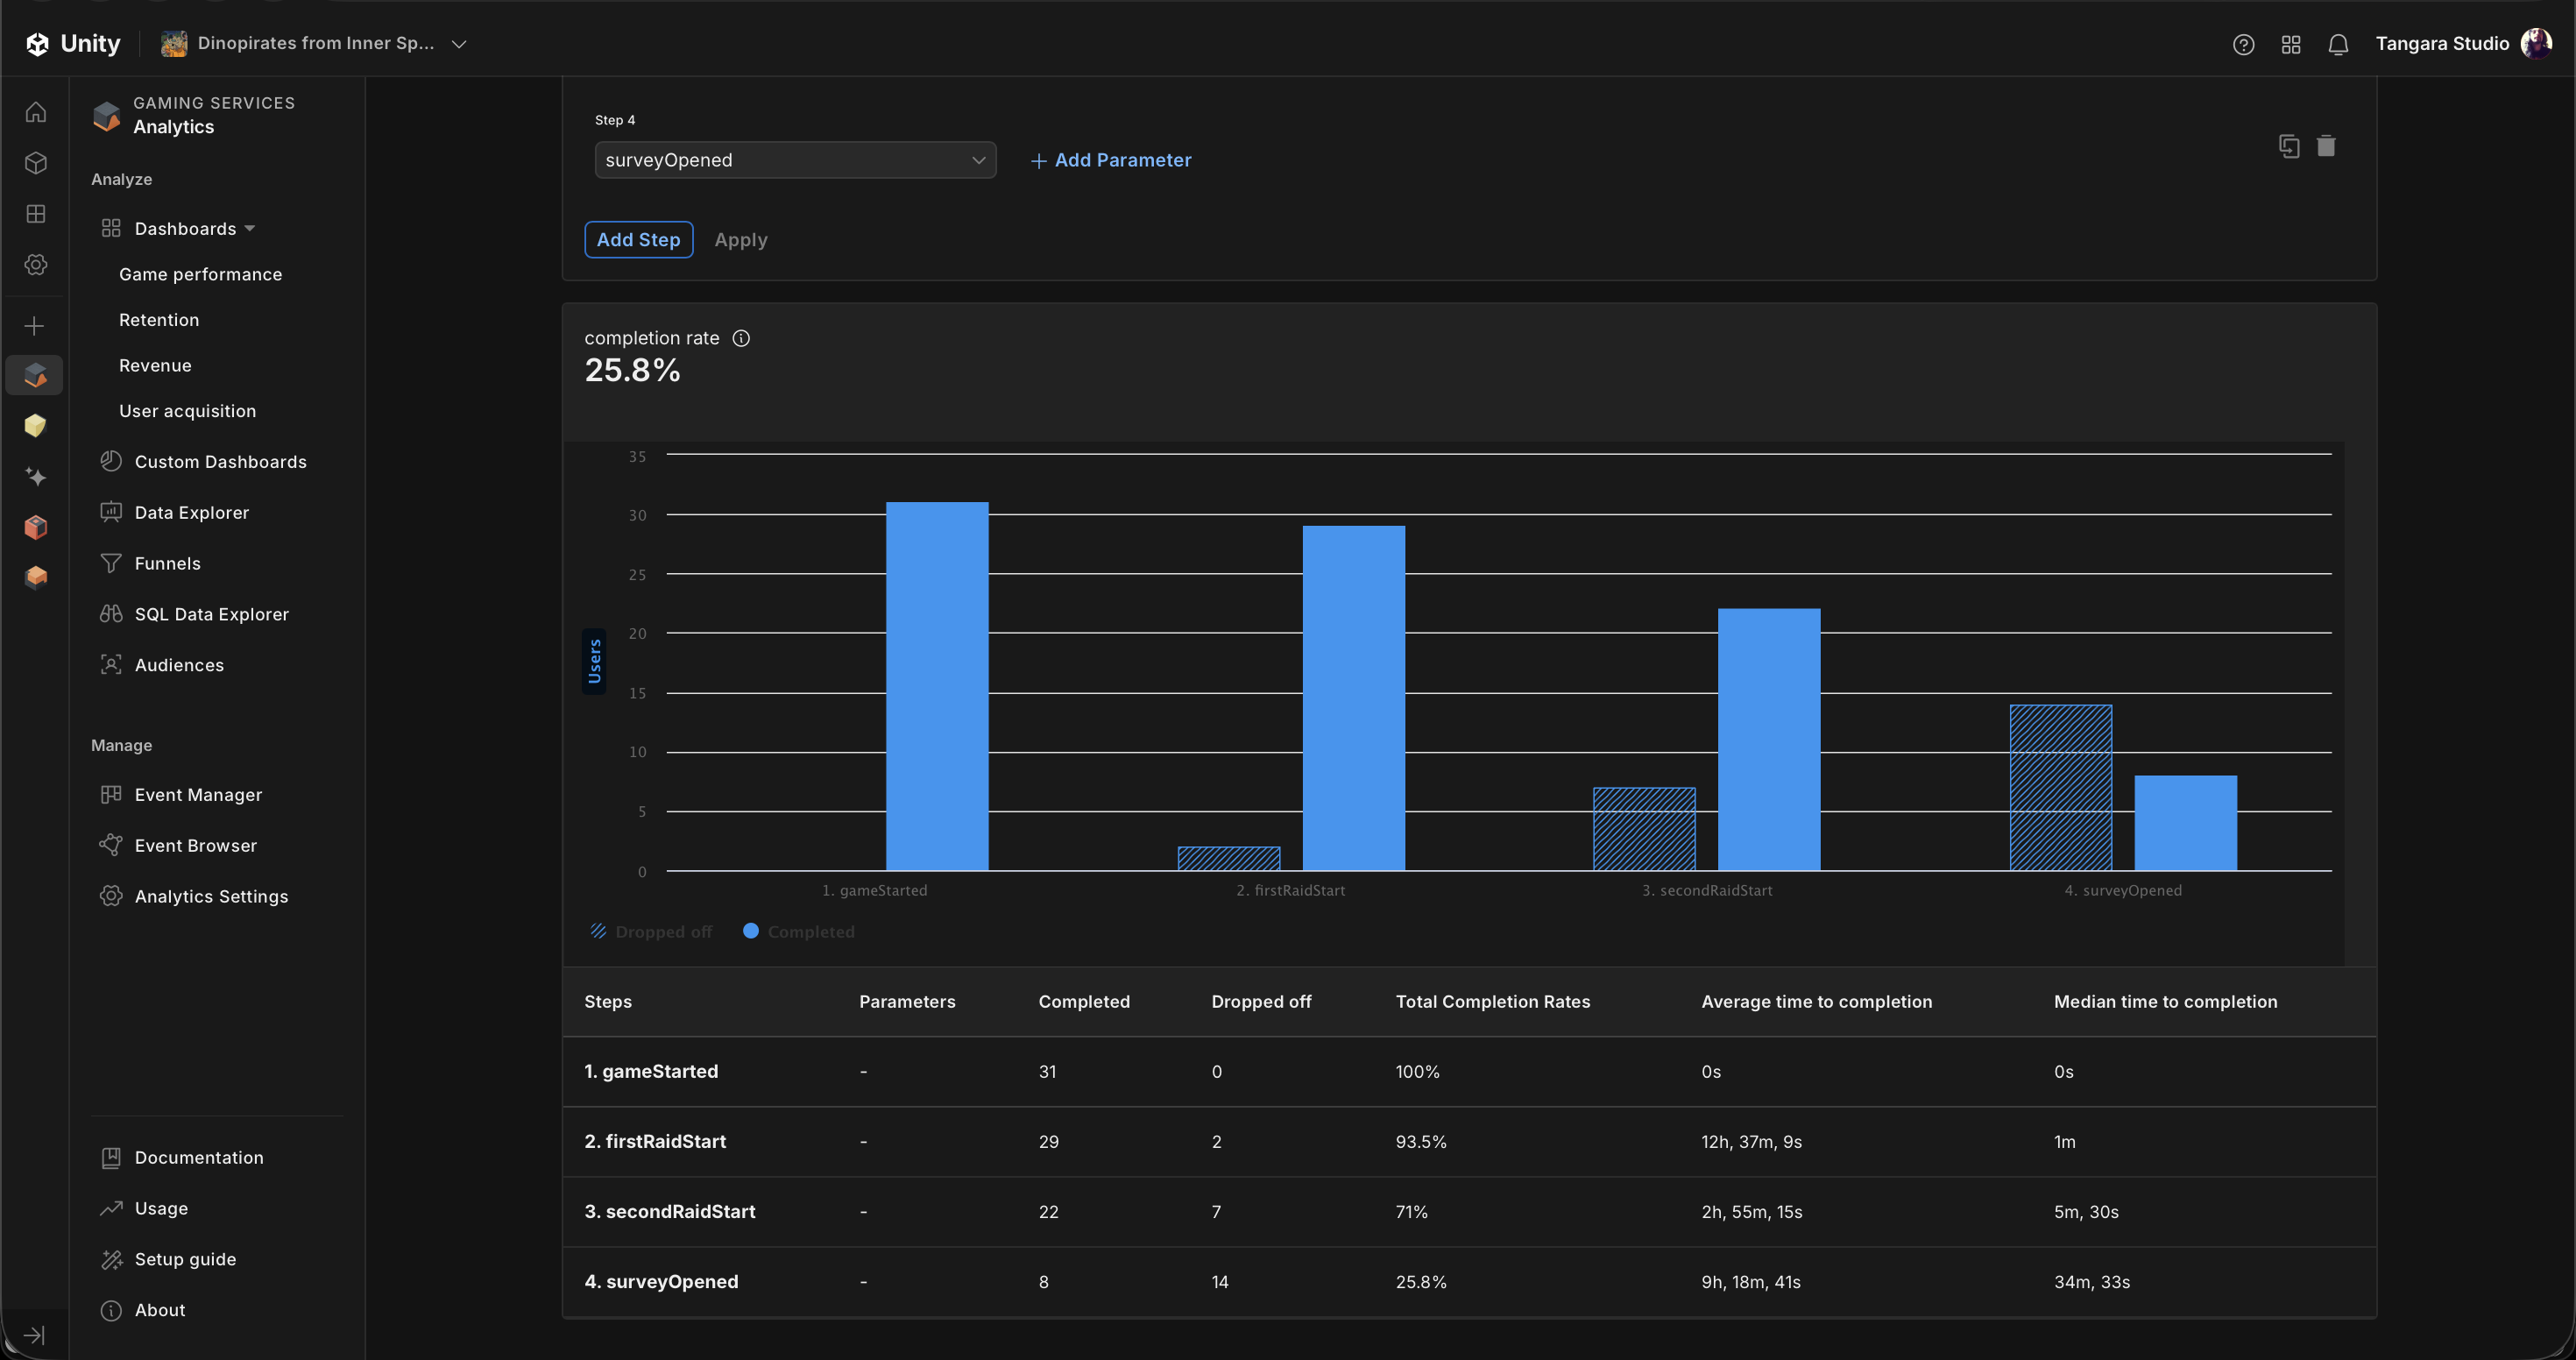
With this custom event and funnel infrastructure in place, you can start answering concrete questions about player behavior. The idea is to iterate on design options, measure their impact on the funnel, and adjust based on the data.
Just like in e-commerce, the goal is to maintain a high entry and exit rate through the funnel. Letting the measurement run for a while (a couple of weeks, for example) allows you to arrive at “normed” values, establishing a behavioral Baseline. From there, any change you make to the game that impacts the funnel can be compared against that baseline to measure its effectiveness.
BONUS TRACK: Unity Analytics costs
Unity Analytics is free up to 100,000 events per month. For a Playtest with 500 players, it’s hard to reach that limit even with frequent custom events. However, it’s important to monitor event consumption to avoid surprises when launching the game to production.
If you exceed the free limit, Unity charges $0.0001 USD per additional event. This means 1 million events would cost $100 USD, which is reasonable for a game with an active player base once in production.
If you hit the limit, you could consider removing lower-priority events or reducing the frequency of some events to stay within the free tier. However, it’s best to plan events well from the start to avoid having to make drastic changes down the line.
Series: Analytics, you can check the other parts here pt1 and pt2